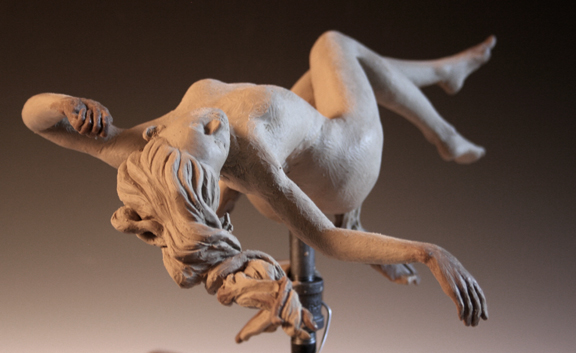
Off with her head!
Yes, it does seem a bit brutal. However, there are several reasons to to mutilate your sculpture. In this case I wanted to hollow the head and neck more and I wanted to work on the face "off sculpt".
By removing the head, I have easier access to the skull and the features ~ sometimes sculpting on the full form can be awkward and space limited, so by removing a piece from the overall sculpture, you can get to it easier.
I will sculpt more on the head and re-attach later. Ears and hair are sculpted later, since they would be squashed in handling anyway.
Tuesday, June 28, 2011
Figure Sculpting Demo - young dancer in ceramic clay #5
No time to work on Monday and only an hour this morning...so not much change, but refined the form and the arms a bit. Later today I hope to have enough time to start her hands.
Then I may remover her head to make it easier to sculpt, be sure of my wall thickness and reattach - we'll see how far I can get....
Sunday, June 26, 2011
Figure Sculpting Demo - young dancer in ceramic clay #4
Last post today. Would have preferred to go further, but hubby just got home and the last of my Studio Tour visitors recently left so will call it a night!Having people come to the studio and sculpting in front of people was a fun experience! Though I didn't get as much sculpting in, as I stopped often to talk with people and show them around, I feel like I've got a good start to this sculpt. I'll let her firm up overnight and get back to work tomorrow. Plan on trying to have her done by the end of the week so check back to see her progress....
Thanks for visiting everyone - I had a great time at the tour and plan on doing it again next year. I think I'll book a model and try to compete a figure pose over the two days next year....
Figure Sculpting Demo - young dancer in ceramic clay #3
Here is the progress - her arms have been attached. The clay is still quite wet. I would be further along, but as it's a studio tour, I stop working to meet with visitors to explain my work and methods ; -).
There is still 3 more hours of the tour, so I will continue to work and post photos the rest of the day - come on out to visit until 5pm today~
Figure Sculpting Demo - young dancer in ceramic clay #2
Next I will begin forming the arms and putting into place.
Stop by today to see the progress in person - I'll be sculpting until 5pm today as part of the Fort Collins Studio Tour!
900 Marble Drive.
Figure Sculpting Demo - young dancer in ceramic clay
For the Fort Collins Studio Tour I'm doing a sculpting demo. I'll be sculpting a young dancer with an attitude using ceramic Paper Clay. Here I've just started. The armature is a steel pipe attached to a board. I've put newspaper around the steel post and wrapped that with a slab of clay. The stick are temporary supports - the clay is wet and heavy and slumps while at this stage. It will be a couple of hours before it's stiff enough to support the weight and the sticks will come out. Will be updating the sculpt all day as I progress.
Come on out toe 900 Marble Drive in Fort Collins today from 10am to 5pm to see the progress!
Saturday, June 25, 2011
Fort Collins Studio Tour Today!
It's a beautiful day for the tour. Finishing up a few details before the 10 a.m. opening!
Tuesday, May 3, 2011
Ceramic Paperclay Fox Sculpture
You may remember that I sculpted a small fox in oil-based clay. I'm still working on the wax pour of it for bronze. I decided that I wanted to make a larger version of this fox and sculpt it using a water-based clay for firing. Since Mile-Hi was out of the CT3 clay that I had planned on using, I opted to try this in water-based ceramic paperclay instead. I didn't do any measuring - I just dove into sculpting. While I did use crumpled paper for filling out the body, there was some distortion and I felt that there was too little clay in some areas and too much clay in others. So I cut this into pieces, hollowed out and reassemble before I completed the sculpting.
I was pleased to find that A) it was as much fun to sculpt the fox the second time around and B) I had no trouble enlarging the sculpture while keeping the same look and feel using a different medium. So, now it's drying in preparation for firing later.
Thursday, April 21, 2011
Ceramic Sculpture turban wrapped woman
Finished sculpting "Hint of a Smile" today. This is water-based clay called Chestnut that I purchased from Mile-Hi Ceramics. It's rather groggy but that can be interesting. This one dried a little faster than I would have liked, due to my deadlines for illustrating my book - so there are a few cracks in the turban. However, that too, may end up being a desirable thing - won't know for sure until it's fired.
I will consider using some epoxy to put in the suggestion of a pupil highlight after firing also.
With the eyes hollowed out, there is additional venting for the sculpt. I'm hoping that offsets how thick the turban ended up. I did cut her in half and hollow her out but added the turban later so that part is fairly thick.
This sculpt is just under life size. I'll post again with her after firing.
I will consider using some epoxy to put in the suggestion of a pupil highlight after firing also.
With the eyes hollowed out, there is additional venting for the sculpt. I'm hoping that offsets how thick the turban ended up. I did cut her in half and hollow her out but added the turban later so that part is fairly thick.
This sculpt is just under life size. I'll post again with her after firing.
Friday, April 15, 2011
First wax pouring of miniature fox sculpture
This is my first time pouring wax in preparation for the lost wax bronze process. I have an old crockpot that I'm using to heat the wax. This wax is something I bought an embarrassingly long time ago and can't remember what kind it is. Karen, at Sculpture Depot, assured me that pretty much any wax will work and different kinds can be intermixed. I thought I'd be really smart and put the block of wax in an old metal can inside the cooker to keep the cooker from getting wax all over it. Nice idea, but it dripped and got wax it it anyway ;-)
I'm using the pour mold (commonly called a dump mold) that I made of my miniature fox (you can see on earlier posts). After melting the wax, I took a small cup, dipped it into the melted wax and poured into the mold. Then swirled the mold around and emptied the wax back into the pot. A layer of wax remained inside. I did this several times to build up layers.
1) crockpot with melted wax in can
2) wax in the mold (I tried tape to secure the mold but it didn't stick very well - rubber bands worked better)
3) the wax mold of the fox - it has flaws and the base would need to be trimmed.
4) I was anxious to see the wax and demolded too soon - the wax was still quite warm and broke.You can see how the swirling of the wax creates a hollow casting.
5) I figured it would take several tries to learn the process enough to get good results. Luckily I can simply melt down the rejects to reuse the wax.
6) Back into the pot for remelting. I tried again that night - but the wax wasn't hot enough so it was a tad lumpy. The results were another imperfect casting so will try again later.
I'm using the pour mold (commonly called a dump mold) that I made of my miniature fox (you can see on earlier posts). After melting the wax, I took a small cup, dipped it into the melted wax and poured into the mold. Then swirled the mold around and emptied the wax back into the pot. A layer of wax remained inside. I did this several times to build up layers.
1) crockpot with melted wax in can
2) wax in the mold (I tried tape to secure the mold but it didn't stick very well - rubber bands worked better)
3) the wax mold of the fox - it has flaws and the base would need to be trimmed.
4) I was anxious to see the wax and demolded too soon - the wax was still quite warm and broke.You can see how the swirling of the wax creates a hollow casting.
5) I figured it would take several tries to learn the process enough to get good results. Luckily I can simply melt down the rejects to reuse the wax.
6) Back into the pot for remelting. I tried again that night - but the wax wasn't hot enough so it was a tad lumpy. The results were another imperfect casting so will try again later.
Labels:
bronze,
cast,
casting,
Colorado,
Fort Collins,
fox,
Lori Kiplinger Pandy,
miniature,
mold-making,
oil-based clay,
sculpting,
sculpture,
sculpture depot,
sculture,
study,
wax mold,
wax pouring
Monday, April 4, 2011
New terracotta clay bust in progress
I have been swamped with designing the layout and illustrations for my newest book for Operation Outreach USA. Love illustrating for them, but wishing there were more hours in the day. Also got word that my other book, Nana's Silly Goats has been printed and is currently being shipped to the states. Nancy said it's gorgeous and I must say the color proofs we reviewed earlier looked great so I'm really looking forward to seeing them. I'll be posting some of the art on my website soon.
Currently I'm working on a new bust of an African American woman. This is sculpted in Chestnut. It's clay left over from my class with Andi Mascarenas and so was a bit stiff to work with as it's rather old. But I couldn't stand to waste the clay, so while it was quite hard, I soaked it well and let it marinate for a couple of days, then wedged it a bit to work the hard bits into the mushy bits.
This was actually started nearly 8 weeks ago and shelved when deadlines hit. When I got back to her, it had gone well past the leather hard stage, so was a challenge to get working again. I had a heck of a time cutting her in half to hollow out! Once I finally got her hollowed and put back together, I worked in her shoulders and started her scarf. These are some early photos and I should have newer ones up in the next day or two showing the progress.
Still not sure what I think of Chestnut. It's a rather stiff and very coarse clay. You can really see the grit and grog. Sometimes I like the earthiness of if it, but other times I find it distracting. I'll probably compare it with some other clays after firing. The plus-sized woman that I sculpted earlier using his clay fired nicely. It comes out a very, very dark brown color, which is interesting.
Currently I'm working on a new bust of an African American woman. This is sculpted in Chestnut. It's clay left over from my class with Andi Mascarenas and so was a bit stiff to work with as it's rather old. But I couldn't stand to waste the clay, so while it was quite hard, I soaked it well and let it marinate for a couple of days, then wedged it a bit to work the hard bits into the mushy bits.
This was actually started nearly 8 weeks ago and shelved when deadlines hit. When I got back to her, it had gone well past the leather hard stage, so was a challenge to get working again. I had a heck of a time cutting her in half to hollow out! Once I finally got her hollowed and put back together, I worked in her shoulders and started her scarf. These are some early photos and I should have newer ones up in the next day or two showing the progress.Still not sure what I think of Chestnut. It's a rather stiff and very coarse clay. You can really see the grit and grog. Sometimes I like the earthiness of if it, but other times I find it distracting. I'll probably compare it with some other clays after firing. The plus-sized woman that I sculpted earlier using his clay fired nicely. It comes out a very, very dark brown color, which is interesting.
Friday, March 4, 2011
I've been accpeted into the 2011 Loveland Invitational Sculpture Show!
It's been a niggling dream for nearly all the 20 years that it's been operating. I remember seeing the articles about it in Southwest Art magazine way back when as I was living and struggling as a young artist if Florida. I always hoped to participate in this show but didn't believe in myself enough.
Thanks to the encouragement of my family and friends, I've started to apply myself to my sculpture last year. It was a real challenge to get my application and images submitted and I truly was uploading it at the midnight deadline ;-)
I am very excited about the opportunity and intend to continue to work hard, learn more and create the best I can!
Thanks to the encouragement of my family and friends, I've started to apply myself to my sculpture last year. It was a real challenge to get my application and images submitted and I truly was uploading it at the midnight deadline ;-)
I am very excited about the opportunity and intend to continue to work hard, learn more and create the best I can!
Thursday, March 3, 2011
Mad dash to enter the Loveland Sculpture Invitational Show
It's been a busy month! After finishing my latest children's book, Nana's Silly Goats, and signing a contract for another one with Operation Outreach USA, I worked long hours getting my submission ready for the 2011 Loveland Sculpture Invitational. I had to purchase some lights and backgrounds and practice my photography, as I couldn't afford to go with a professional photographer at this time.
Having no other place, I set up a temporary photo studio in the garage (thank goodness we insulated!) and learned to control my white balance and lighting better. It took two trips to Boulder (pretty drive, but still a 2+ hour round trip) to Mike's Camera to get the softbox and paper.
Next I scoured off the patinas that I did in class that I felt were too dark and heavy. Since I didn't like the existing patina, I figured it wouldn't ruin it to try and take it off and do another. So I spend days doing glazes on the ceramic until I found what I liked. This seated woman, "Sitting Pretty" is definitely better with the new patina as the older one was very heavy and nearly black, obliterating detail.
The sleeping woman came out rather well - the patina is soft and warm and compliments the sleeping figure well.
Ascension is still a work in progress, but is coming along.
Next is Sweetness, my plus-sized figure and last is Contemplate, a seated nude.
Hopefully I made the deadline - it was midnight tonight, but I did have some trouble using Zapplication and by the time Paypal processed it was 12:01.
Well - I did the best I could and I'm glad that I tried. Whether I made it into the show or not
learned a lot and it's all part of the journey.
Now for a well-earned glass of wine!

Having no other place, I set up a temporary photo studio in the garage (thank goodness we insulated!) and learned to control my white balance and lighting better. It took two trips to Boulder (pretty drive, but still a 2+ hour round trip) to Mike's Camera to get the softbox and paper.
Next I scoured off the patinas that I did in class that I felt were too dark and heavy. Since I didn't like the existing patina, I figured it wouldn't ruin it to try and take it off and do another. So I spend days doing glazes on the ceramic until I found what I liked. This seated woman, "Sitting Pretty" is definitely better with the new patina as the older one was very heavy and nearly black, obliterating detail.The sleeping woman came out rather well - the patina is soft and warm and compliments the sleeping figure well.
Ascension is still a work in progress, but is coming along.
Next is Sweetness, my plus-sized figure and last is Contemplate, a seated nude.Hopefully I made the deadline - it was midnight tonight, but I did have some trouble using Zapplication and by the time Paypal processed it was 12:01.
Well - I did the best I could and I'm glad that I tried. Whether I made it into the show or not
learned a lot and it's all part of the journey.
Now for a well-earned glass of wine!

Thursday, February 24, 2011
Miniature Fox Sculpture with New Patina
I wasn't satisfied with the first casting and patina of my miniature fox sculpture, so try, try again. This one came out much more to my liking and I earned a good lesson: solid colors show texture and form much better than variegated colors. Especially in such small scale (about 3"). I have a base that I'm preparing so when it's dry we'll see how it looks on a solid wood base.
My next endeavor will be to cast this fox in wax and chase it. I have an appointment with Art Casting Foundry in Loveland, where I'll be having this little guy bronzed!
I'm quite excited about that - I sculpted him with mold-making and bronzing in mind as I want to learn both processes.
Since this patina came out much better, it gave me the urge to work on some of my other sculptures. There were two in particular that I didn't care for how the original patina came out. Since I wasn't happy with the over all look, I decided that I could risk ruining them further by removing the patina and trying a different. It was a good choice - and I will post new photos of them soon.
Lastly, I've been struggling with my photography. On a shoe-string budget, I've been trying to outfit my photo area and have been making loads of test photos. Thank goodness for digital! Back in the day you could photo for a show, send the film off and not find out till a week later that they were awful! But now - Bam! upload the photos and see how bad they are instantly! ;-) Actually, I made real progress this week in getting white balance and lighting to agree - so new photos will be up soon!
My next endeavor will be to cast this fox in wax and chase it. I have an appointment with Art Casting Foundry in Loveland, where I'll be having this little guy bronzed!
I'm quite excited about that - I sculpted him with mold-making and bronzing in mind as I want to learn both processes.
Since this patina came out much better, it gave me the urge to work on some of my other sculptures. There were two in particular that I didn't care for how the original patina came out. Since I wasn't happy with the over all look, I decided that I could risk ruining them further by removing the patina and trying a different. It was a good choice - and I will post new photos of them soon.
Lastly, I've been struggling with my photography. On a shoe-string budget, I've been trying to outfit my photo area and have been making loads of test photos. Thank goodness for digital! Back in the day you could photo for a show, send the film off and not find out till a week later that they were awful! But now - Bam! upload the photos and see how bad they are instantly! ;-) Actually, I made real progress this week in getting white balance and lighting to agree - so new photos will be up soon!
Saturday, January 15, 2011
Cast sculpture miniature fox
This is the final cast piece from the mold I made of my miniature fox. You can see the original oil-based clay sculpt on my December blog. The instructions and process of how I made the mold are in the previous post.
This was cast using Smooth-On's Smooth-Cast 300 liquid plastic.
This is an easy product that is mixes compounds A+B in equal amounts. The plastic cures in a matter of minutes to a very white plastic. It demolded from the silicone very easily.
The down side is that, well, it's PLASTIC. Not my favorite substance. But this is a learning process . I painted the plastic casting using acrylics to mimic dark stone and the results are fine. I should have done a little more clean-up to the lines where the mold joins together, but for a first try at casting, I thought it came out well.
I could also pour melted wax into this mold, clean up the wax and take it to bronze at some point. We'll see ;--)
This was cast using Smooth-On's Smooth-Cast 300 liquid plastic.
This is an easy product that is mixes compounds A+B in equal amounts. The plastic cures in a matter of minutes to a very white plastic. It demolded from the silicone very easily.
The down side is that, well, it's PLASTIC. Not my favorite substance. But this is a learning process . I painted the plastic casting using acrylics to mimic dark stone and the results are fine. I should have done a little more clean-up to the lines where the mold joins together, but for a first try at casting, I thought it came out well.
I could also pour melted wax into this mold, clean up the wax and take it to bronze at some point. We'll see ;--)
Miniature Fox Sculpture mold making
I took the miniature fox that I sculpted in December and made a mold (often called a pour or dump mold). I used Dragon Skin mold-making products by Smooth-ON.
1). Dragon Skin is a 2-part silicone mold - you mix equal parts of A + B. I also used Liquid Gloves - it forms a barrier to protect your hands from absorbing chemicals or paint - it feels nice, goes on like hand lotion.
2) I cut the bottoms off of two plastic cups to form a cylinder around the fox sculpture. I put a small bit of clay on the bottom of the fox sculpture to help it stay in place, then put the cups over it and sealed the bottom of the cups to the base to keep the silicone from leaking out.
3) I also put the whole thing on a small tray in case it leaked - but this time I sealed it well and nothing leaked out.
4) Mixing Parts A + B
5) Poured into the cylinder and curing (left it over night)
6) I took this to class and my instructor, Rik Sargent, helped me to cut the cured silicone on two sides on a diagonal to get the clay out.
1). Dragon Skin is a 2-part silicone mold - you mix equal parts of A + B. I also used Liquid Gloves - it forms a barrier to protect your hands from absorbing chemicals or paint - it feels nice, goes on like hand lotion.
2) I cut the bottoms off of two plastic cups to form a cylinder around the fox sculpture. I put a small bit of clay on the bottom of the fox sculpture to help it stay in place, then put the cups over it and sealed the bottom of the cups to the base to keep the silicone from leaking out.
3) I also put the whole thing on a small tray in case it leaked - but this time I sealed it well and nothing leaked out.
4) Mixing Parts A + B
5) Poured into the cylinder and curing (left it over night)
6) I took this to class and my instructor, Rik Sargent, helped me to cut the cured silicone on two sides on a diagonal to get the clay out.
Friday, January 7, 2011
"Ascension" Oil clay figure sculpture work in progress
I'm very excited about my first oil-based clay figure sculpture. It's the first time I've used a wire armature. This is loosely based on a life pose from the Art Students League class that I took under Rik Sargent recently. I'm still getting used to the Classic Clay - rather sticky feeling in comparison to water-based clay.
You'll notice that some of the hands, feet, hair and cloth are a darker color. Rik showed me that you can mix casting wax with the clay to make a much harder clay mix that can hold smaller detail better than the oil clay alone. So even though I had fully sculpted her hands and feet, I cut them off, re-sculpted them using the wax/clay mix and reattached them.
Because I wasn't really basing the sculpt on any particular pose from the model, it changed as I aggressively manipulated the figure for more drama - thereby exposing some of the armature wire in the process. In addition, the pipe supporting her is also in the way. I will be making a mold and casting this piece in wax. Once I have the wax, I'll be able to sculpt away the imperfections caused by the wires and post.
Finally, I may make a mold of the wax and take it to the foundry for casting my first bronze. When she's complete, the flowing cloth will be her only support - she'll appear suspended in mid-air, caught in the moment of ascension.

Rik has generously offered to help me through the steps working with moldmakers and the foundry. If you ever have the opportunity to take a class with Rik DO IT! He's a very giving and inspiring sculptor and teacher!
Monday, December 20, 2010
Miniature Fox Sculpture in Oil Based Clay
I need to start learning the mold-making process, so I sculpted a small image of a fox in oil-based clay. I chose the animal and the pose to make for as easy of a mold as possible - notice that the entire composition is very pyramid in shape. I made a simple armature of a nail driven into a small wooden disc. Then I used oil-based clay to sculpt the fox in a more stylized manner.
It was fun to sculpt something different from figure and interesting to try and capture the essence of a fox without worry of trying to be anatomically correct. The oil-based clay is still kind of new to me and the sticky texture is still something that I'm getting used to. The upside is that you can stop and start as many time as you wish and it never dries out like water-based clay.
This measures 3.5" tall and is sculpted in Classic Clay purchased from Sculpture Depot. Next I'll be showing the process that I used to make a pour mold of this sculpt. I learned this technique in the sculpting class that I took with Rik Sargent at the Denver Art Students League.
It was fun to sculpt something different from figure and interesting to try and capture the essence of a fox without worry of trying to be anatomically correct. The oil-based clay is still kind of new to me and the sticky texture is still something that I'm getting used to. The upside is that you can stop and start as many time as you wish and it never dries out like water-based clay.
This measures 3.5" tall and is sculpted in Classic Clay purchased from Sculpture Depot. Next I'll be showing the process that I used to make a pour mold of this sculpt. I learned this technique in the sculpting class that I took with Rik Sargent at the Denver Art Students League.
Thursday, November 11, 2010
Contempative Woman - a ceramic nude sculpture work in progress
I started this sculpt when taking Philippe Faurat's figure study class at the Sculpture Depot two months ago. If you ever have the opportunity to take Philippe's class then DO IT! He's an amazing sculptor and a hoot and a half too ;-) So this technique is new to me - the sculpture is almost entirely solid. According to Phillipe - she'll fire just fine if REALLY DRY first. (Fingers Crossed) As I live in semi-arid Colorado, dry isn't really a problem here. I'd say that I had about 10 hours of model time on this piece and put in another 4 to 5 hours sculpting at home and she's about 80% done. I’m juggling illustrating a children's book at the moment, so I've kind of shelved her for a while and just misted her with water a few times.
This is a low-grog ceramic clay and it is 16" high. I believe that it will fire to a white finish and plan on doing a marble/stone look for the patina if she survives the firing. I'm looking forward to taking a few more hours to refine and finish before the long, slow drying process.
On another note – I may have a kiln! I’ve been looking on Craigslist for a year now and if all goes well, I should have it by next weekend….then I’ll be able to fire my pieces and be more productive – very exciting!
Next up, I’ll be showing you my first oil-based clay figure. It’s one I’m working on from a class from the Denver Art Students League with Rik Sargent as the instructor. Another terrific teacher – you really need to look at Rik’s work – his monumental bronzes are amazing and he’s been such an informative teacher – I’ll do my next post on his class and my new piece….
Friday, October 1, 2010
Sleeping Nude
Busy, busy, busy. Unfortunately no time to post lately. I had a wonderful time at Sculpture Depot in Loveland last month. They sponsored a workshop with Philippe Faraut (my second). The first was a portrait workshop years ago, so I was thrilled to get to do a workshop on the full figure with Phillipe. It was a good class - a nice, diverse group of people to share the journey. We spent two days doing studies that I enjoyed, then destroyed ;-) Then a day doing one larger piece. I'm still working on that one at home from memory.
I'm getting better at letting go, smashing up studies or sculpture that isn't working. Don't get me wrong - I was quite pleased with many of the small studies, but the process and experience was what I was after, not the physical product. So I only kept one of the smaller studies. We had about 4-5 hours with the model in this pose, then I did the rest at home. This is water based clay with low grog and the piece is about 9 inches long. This one I sculpted solid and didn't hollow. I'll allow to dry very, very slowing and try firing it my my ancient, questionable little kiln. If it doesn't make it, well, it was fun to sculpt anyway ;-0
Subscribe to:
Posts (Atom)