Tuesday, June 26, 2012

Suit up!


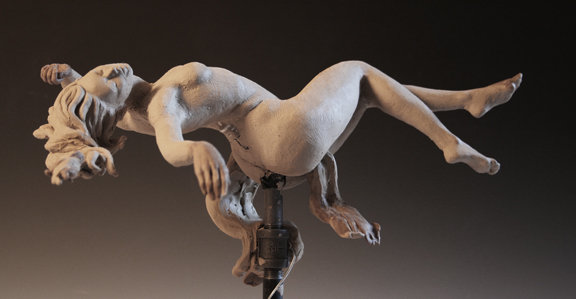
I had loads of  fun sculpting her and even more reaction to her as a nude figure......but I always wanted to do something more with her. So this week I had a ball sculpting a nice swimsuit for her and I think this look 'suits' her very well ;-)

Since this piece was a finished fired ceramic sculpt I opted to created her clothes using an artist's two-part epoxy, Aves Apoxie Sculpt.

You simply knead together equal parts of the epoxy until well mixed. I dampened the ceramic a little before applying the epoxy and sculpting it onto the figure. There is a window of time (1-2 hours) where the epoxy is workable and it gradually becomes stiffer. When it was stiffened up to the point of being quite firm, I pressed textured cloth onto the surface to give it a texture similar to the ceramic.

Once the epoxy is cured (24 hours) I was able to patina it in the same manner as the original sculpt so it looks like the suit has always been there.
This was on my to-do list for quite some time but as I rather liked the nude sculpt and had received a good response from her as is, I was concerned about ruining, rather than improving the piece.

I must say, however, that I'm very pleased with the outcome and I plan on keeping this in mind for other projects!

Monday, June 25, 2012

Finishing "Waiting on the #9"

Sorry for the poor photos - I was rushed and simply threw a spotlight on this and grabbed some shots before the sculpt went out to the mold-maker this morning. I had a bad sculpting day earlier this week and over-worked the piece. It went from nice and fresh to stilted and posed. Part of if was the softness of the clay for such a small sculpt and part of it was me rushing because time was running out to get this into bronze in time for the show.

I also noticed that as I overworked, I ended up pressing on her neck a bit, causing it to shorten and thicken. So I cut off her head and neck and sculpted a new one. This time, I added flowing hair to add to the breeze that was ruffling her dress. You'll notice that her hand and purse are a different color. I used Jmac Classic clay for the purse, as it is a harder clay for the tiny detail. Then, since the fingers were too soft to hold their own form with the Chavant, I added 1/2 Classic to the Chavant and mixed together. I could have used straight Classic, but was concerned that the difference in clay would impact the surface of the clay and not hold the marks the same way - to be safe, the mixing of the two clays gave a better transition from the arm to the hand. There is armature wire (22 gage braided) that is poked through her index finger to give enough strength for holding the purse and also in the blowing sections of hair.

This sculpt was a big learning process and I struggled a lot with it - which is good - from adversity comes improvement. I learned that every clay has its own strengths and weaknesses and it's very important to choose the right clay for the scale and style of subject. As I stated before, on a larger scale piece I think I would enjoy the soft, buttery feel of the Chavant Le Beau Touche a great deal - it would be easy on the hands and effortless to apply - it just wasn't the right clay for a full sized sculpt with a 1.5" face ;-) I also learned that it would be a good idea to bolt the armature wire of the feet to the board to stop any lateral motion or shifting, which causes cracks in the ankles and also can lead to minute twisting that you don't notice till later.

I enjoyed this sculpt - even the several times that I had to rip off and re-do sections and I liked the attitude and pose. This is one that I may come back to and enlarge to a bigger scale for bronze at some point. For now - it is off to the mold-maker who will chop her up and make the mold and pour the wax - until then - time to clean the studio and get the next piece started...

Friday, June 15, 2012

Refining the pose

 I've been a bit preoccupied with the High Park Fire near here. It's been very smokey and some of our friends were evacuated. The fire is over 50,000 acres but the firefighters have been amazing and we're at 15% containment - if we could get some rain and a break from the winds....

We've spent the past two years renovating a little log cabin by the Poudre river in the mountains. We only just got the new well, pump and bathroom installed, not to mention all the work re-chinking and a huge amount of overall repair. Hoping it survives this fire.

So - on to work. Have I mentioned I'm not in love with this clay? Chavant makes wonderful products and Le Beau Touche is one of them - however it takes the right clay for the right job and my opinion is that this clay is wonderful for larger scale works. At 1/5 scale its too soft and creamy but I can see how those attributes would be delightful at a larger scale and much easier on the hands. I'm sure that I'll enjoy using it again when I work larger. For now, just trying not to squoosh all the hard work.

I've been refining all the areas that I had to recreate after the shipping disaster. You can see that I have taken her hand off to sculpt separately. I added a bit of wax to the clay to resculpt the hand to make it a bit firmer. Still working out some issues on the dress wrinkles and need to get her other sandal sculpted again. Have fallen way behind. My original goal was to have this finished and in bronze for the Loveland Sculpture Invitational, however with the major setback of having the resculpt without the model, well, that's simply not going to happen. Moldmaking takes several weeks and bronze another 10-12 weeks. How disappointing.


Tuesday, June 5, 2012

Introducing the Proportional Caliper- my new BFF

 The proportional caliper is an amazing tool and I'm not quite sure why I didn't start using it earlier. Stupid stubbornness perhaps, but likely I felt like my eye was pretty good and I didn't want to mechanically tie myself down to tedious measurements. Most especially since I tend to work loosely from the model and create what I see in my own mind more than what I see before me.

However - I can thank John Sherrill Houser for recommending this tool for his class and Victor Issa for for catching some proportional mistakes that weren't obvious but were nonetheless there.

I got my calipers at Sculpture Depot and they reduce to 1/5 or enlarge up to 5 times. I got the metal ones because they would fit into my luggage for the plane trip to Brookgreen, but I like the look of the Polycarbonate ones and will likely get them soon.

In a nutshell - you set the calipers for the scale of enlargement or reduction you need - you measure your object with one end and the opposite end will have the proper change of size. For instance, "Waiting on the #9" is a 1/4 scale sculpture. I set the sliding bolt at the 4 mark which allows me to measure the length of the back of the model's hand and the flip the tool over and use the corresponding 1/4 scale size to check the size on the sculpture. In this case - it was from the bend of the wrist to the first knuckle of the middle finger.

I also measured from the ankle bone to the middle of the knee and the width of the ankle bone. Constantly checking in this manner is a wonderful way to keep things in check and to identify an area that may be out of proportion. I'm in love with this tool and it's my new BFF of my studio and use it for many measurements throughout the entire figure.

That said - the caliper is a mechanical device and won't dictate exactly what I do. There are times when  deviating from the model's measurements is an artistic and deliberate choice made to enhance the figure, make the pose more dynamic and interesting or to make an artistic statement....as long as these choices are made by the artist and are not a product of accident or laziness.

Friday, June 1, 2012

"Ascension" Oil based figure sculpture of nude woman rising

 I'm very excited about my first oil-based clay figure sculpture. It's the fist time I've used a wire armature. This is loosely based on a life pose from the Art Student League class that I took under Rik Sargent recently. I'm still getting used the the Classic clay - rather sticky feeling in comparison to water-based clay.


You'll notice that some the hands, feet, hair and cloth are a darker color. Rik showed me that you can mix casting wax with the clay to make a much harder claymix that can hold smaller detail better than the oil clay alone. So even though I had fully sculpted her hands and feet, I cut them off, re-sculpted them using the wax/clay mix and reattached. Because I wasn't really basing this sculpt on any particular pose from the model, it changed as I aggressively manipulated the figure for more drama - thereby exposing some of the armature wire in the process. In addition, the pipe supporting her is also in the way. I will be taking a mold and casting this piece in wax. Once I have the wax, I'll be able to sculpt out the imperfections caused by the wire and the post support. 


When she's complete, the flowing cloth will be her only support - she'll appear suspended in mid-air- cause in the moment of Ascension. This is the first piece that I've considered taking all the way to bronze. Rik has generously offered to help me through the steps. If you ever have the opportunity to take a class with Rik do it - he's a very giving and inspiring sculptor and teacher!


Correcting a proportion mistake in sculpture

At the National Sculpture Society's Sculpture Celebration Weekend held in Loveland last week, I was so fortunate to meet some amazing, world-class and world-known sculptors. One of them, Victor Issa, generously critiqued my sculpt in progress, "Waiting on the #9".

The original sculpture was in good proportion and I had verified measurements with my calipers. However, with the severe damage incurred in shipping, I was forced to cut off her legs and arms and re-create them, as well as her head and neck.

Here's where the distortion came into play. I was sculpting from memory. I did do a quick measurement of the feet to be sure they were the correct (and both the same) size. But I got lazy when re-sculpting her hands and just set about sculpting them as I remembered them before the accident. That was a rather arrogant mistake indeed!

Luckily, Victor's practiced and keen eye detected what I couldn't see for myself. It's rather like when you write a paragraph and have "...the the" written twice and you can't see that simple mistake. Victor noticed that the wrists and ankles were too heavy (my own are exceedingly small and I think I over-compensate my own wrists and ankles) and that the hand on her waist was too small. He put it nicely and delicately but when I got home and studied the sculpt I found that the hand was WAY to small! So glad he caught that, because I hadn't. So off came the hand for re-sculpting. The hand should measure from the palm on the chin to the top of middle finger 3/4 up the forehead. We have established mine was wrong, so I won't fess up to just how short her hand was when I did the original comparison. Above is a photo of the now-correct measurement. Thanks, Victor, for that and many more lessons!