Showing posts with label oil-based clay. Show all posts

Wednesday, July 3, 2013

Sturdy armature for new sculpt

 Excitement and enthusiasm for sculpting is a wonderful thing. Impatience is not, however. I've had a few occasions where my excitement over starting a sculpt when I didn't have all my materials ready led to trials and tribulations later.

This time, I'm spending more time in the prep phase which is going to pay off in spades later when I get to real sculpting adventure.


On my last sculpt, "Loss" (working title) I didn't secure the armature 'feet' firmly to the base board, which meant that with jarring, came shifting. Any kind of movement of the armature can create problems and an armature that is weak or prone to movement can wreak havoc on the work.

I reigned in my enthusiasm for my new piece, "Joy" (working title) and set about to make the bones of this sculpt strong. I began by drawing out the template on the baseboard of where the clay base for the sculpt and placement of the feet will be, as this will be a companion piece to "Loss" which is currently at the foundry being poured as a bronze.

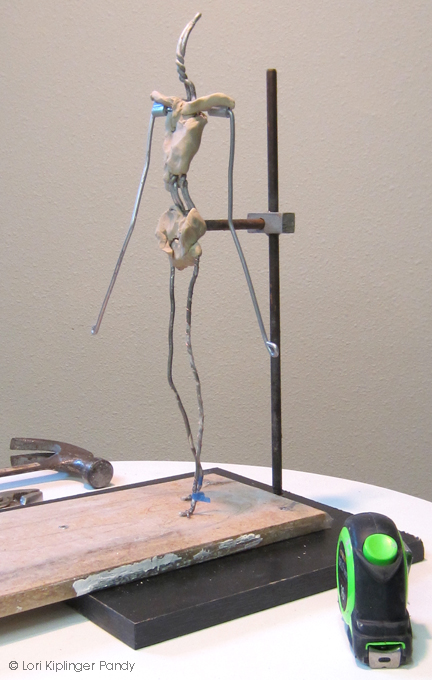
Next I used my drill to countersink a hole for the washer and nut that holds the vertical post onto the baseboard. Then I created arms using armature wire and wire sleeves and attached the arms at the shoulder. The arms are long at the moment and I will cut the excess off once I start laying in the anatomy. Measure twice and cut once - a wire that is too short is useless.

Finally, I marked where the bottom of the feet will be on the leg wires and then hammered nails over the remaining wire ends to secure them firmly to the board. No shifting! It's a bit awkward looking - you have to keep in mind that there is going to be clay on the base that covers this up and the feet are actually higher up on the leg wire. You can see that I started to wrap some fine gage wire around the armature wires. I don't always do this, but some clays need more to grip onto than just the smooth single armature wire. By wrapping wire I give the clay a lot of area to grab onto and hold tight.

This sculpt will measure about 15" tall by 15" long by 6" wide when complete.

Monday, November 19, 2012

Ecorche - anatomy study of muscles in clay

 I'm continuing with my self-study, refresher of anatomy. This 1/2 life sized sculpture is being created by layering on the clay as muscles. As I work on the piece, I'm considering the role of the muscle - how round or flat is it? What is the function of the muscle and how does it effect the surface shapes when flexed?

Yes, this is a tedious exercise - and well worth every minute. It's so tempting to stop and go to surface forms, but that would defeat the purpose. Forcing yourself to really place the muscle, with it's origins and insertions, leads to greater understanding of the body....and understanding the body frees you to sculpt with confidence.


Jmac classic clay medium.


Monday, September 17, 2012

Correcting facial proportions in clay

 I'm back in my studio now and working on "A Good Read". Still blocking in the basic musculature and forms. While working, I could see that the lips were too close to the nose, giving too much chin to the face. So I have shown how to fix this problem.

First I took my sharp metal shaper and cut upwards towards the nose to cut the lips off. Then I removed the lips. Next I replaced the lips onto the sculpt only slightly lower.

After the lips are in place, I rolled out a small coil of clay and placed it above the upper lip to fill in the crack. Then I continued sculpting and adding more forms to the clay.

You can see that everything is very rough and that I am not concentrating on any one area. As I work on the piece I'm constantly moving around the and working front, back, side and adding clay as I go to keep the piece moving along.

Tuesday, July 3, 2012

Beginning State of Grace final

     Starting the final clay for "State of Grace". This time I'm using Jmac Classic clay - medium for the body and firm for the head and hands. I did the maquette a while ago and now that I've finished a few things, it's time to start this one. I'm using the 1/4 scale (16") Truform armature for the first time. So far it's going pretty well. It's nice to have the hips and torso blocked in with the Truform, but I did find I had a few problems with the placement of the support bar. After working on it for a while, the weight of the clay pulled down on the lower part of the body and elongated it out of proportions.

Using my calipers, I was able to tell it was quite distorted, with the upper torso much too long. The weight have pulled down on the wire spine.

So I cut her up and removed her, shortened the spine wire in the torso and re-bolted her back into place. Hopefully I have it tight enough now that this won't repeat.

Because she's floating the weight is more of a factor - if she where standing and supporting her weight it wouldn't happen as much. But I won't be sculpting the fabric support until later. You can look back into earlier posts to see the maquette that I'm working from.

I'll be taking time on Friday and Monday to chase the waxes for my bronze Harriet Tubman and Waiting on the #9 - then back to working on this pose on Tuesday.

Monday, June 25, 2012

Finishing "Waiting on the #9"

Sorry for the poor photos - I was rushed and simply threw a spotlight on this and grabbed some shots before the sculpt went out to the mold-maker this morning. I had a bad sculpting day earlier this week and over-worked the piece. It went from nice and fresh to stilted and posed. Part of if was the softness of the clay for such a small sculpt and part of it was me rushing because time was running out to get this into bronze in time for the show.

I also noticed that as I overworked, I ended up pressing on her neck a bit, causing it to shorten and thicken. So I cut off her head and neck and sculpted a new one. This time, I added flowing hair to add to the breeze that was ruffling her dress. You'll notice that her hand and purse are a different color. I used Jmac Classic clay for the purse, as it is a harder clay for the tiny detail. Then, since the fingers were too soft to hold their own form with the Chavant, I added 1/2 Classic to the Chavant and mixed together. I could have used straight Classic, but was concerned that the difference in clay would impact the surface of the clay and not hold the marks the same way - to be safe, the mixing of the two clays gave a better transition from the arm to the hand. There is armature wire (22 gage braided) that is poked through her index finger to give enough strength for holding the purse and also in the blowing sections of hair.

This sculpt was a big learning process and I struggled a lot with it - which is good - from adversity comes improvement. I learned that every clay has its own strengths and weaknesses and it's very important to choose the right clay for the scale and style of subject. As I stated before, on a larger scale piece I think I would enjoy the soft, buttery feel of the Chavant Le Beau Touche a great deal - it would be easy on the hands and effortless to apply - it just wasn't the right clay for a full sized sculpt with a 1.5" face ;-) I also learned that it would be a good idea to bolt the armature wire of the feet to the board to stop any lateral motion or shifting, which causes cracks in the ankles and also can lead to minute twisting that you don't notice till later.

I enjoyed this sculpt - even the several times that I had to rip off and re-do sections and I liked the attitude and pose. This is one that I may come back to and enlarge to a bigger scale for bronze at some point. For now - it is off to the mold-maker who will chop her up and make the mold and pour the wax - until then - time to clean the studio and get the next piece started...

Monday, May 21, 2012

Shipping disaster - or how to destroy a sculpture...

 How utterly disappointing. I was looking forward to finishing "Waiting on the #9" this week following the National Sculpture Society's Celebration Weekend in Loveland. I had this sculpture professionally packed and shipped from a shipper near Brookgreen Gardens.

When I got the box, all looked great - from the outside. Not a dent and it indeed was carried to my door right side up. When I opened it, however, this is the what I found. The sculpt had come completely off the vertical armature post. The screw was stripped and the sculpture was lying face down, ripped off at the ankles.

Obviously it had rolled around hard because the armature wire from the ankles down was torqued and bent. The whole thing is badly smashed.

The sculpting base had been screwed to the plywood under the inside box (it was double boxed) so the base was secure. I can see that the sculpture stand base is compromised, the vertical support pipe is loose and the bolt tightening it will no longer hold it tight because the board where the pipe fits has been weakened, so the pipe will no longer be sturdy on this armature. You can see the stripped pipe treads and how it has metal burs coming off on my hands.

This is sickening and I can't deal with it today because I'm too disappointed, not to mention behind my projected schedule to finish and get to the foundry. Instead, I'll head to the hardware store to collect items for a new armature and assess if anything can be salvaged tomorrow when I'm not as angry over this $150 shipping nightmare....

Wednesday, May 16, 2012

Adding clothes to the female form in sculpture

 The pose was classical nude, but I wanted to sculpt something a bit more casual, contemporary and fresh. When I began sculpting this figure, the attitude of the stance gave me the impression of someone waiting - caught between patience and impatience - you know - when you've been waiting patiently but now are beginning to get just a bit antsy because there is really someplace you want to be....

This summer we took a trip to Switzerland and Italy and I was enthralled by the public transportation there. Buses and trains, in addition to walking and bikes are an everyday mode of getting around and people are so cavalier about getting where they want to go in this manner. As we don't have commuter trains and not a very convenient bus route/time in my town, this was fascinating to me. Especially because we love trains!

So this young woman is representative of that feeling - she's "Waiting on the #9".

The model brought in a beach dress, but I wanted something that looked more like a dress you'd wear in the city - so I created one that I liked and gave her casual flip flops. Next, I'll be adding a sweet and sassy little handbag casually draped from her fingers behind her back.

I never got into dressing up Barbies when I was a girl - I was more interested in making them climb trees, fly like superheros or ride horses - clothes or not! Therefore I'm a bit surprised about how giddy I am at 'designing' outfits and dressing my sculpt...something my 8th grade Home Ec. teacher would be amazed at considering what a total, dismal failure I was (am) with anything to do with sewing ;-) Well - clay is easier in my world so I think I'll stick with that.

Tuesday, May 15, 2012

Continuing the rough in of standing figure

This is a continuation of blocking in the standing figure on day 3. I'm using my ipad to take quick photos as I go so the quality of photo isn't very good, especially the lighting.
After I took these photos, I raised up her support bar on the armature stand so I could add some additional clay under her feet. I felt it was too thin, plus I had decided that I wanted to have her wearing flip flops and a dress and needed room to put her shoes. Also the slightly larger base will give the piece more support - both in bronze and also when I ship the soft clay across the country back home to continue working.

I find the darker red clays are a bit more difficult to see the form over the lighter tan clays. Not everyone will agree with me on that, but it's a personal preference.
I made many changes as I worked quickly and didn't have the opportunity to photo those changes. I cut her head off twice to raise and lengthen her neck. It was correct by the proportions of the model, but didn't feel quite right on my piece, for the attitude that I was going to convey. So those changes were quite satisfying to make. When sculpting for yourself, you're quite free to change proportions and faces and hair - something I do quite often. That's not the case for a true portrait, of course, where you need to represent the client accurately. However, as I'm deciding the course of this particular piece it's quite liberating to create her however pleases me. Tomorrow I will post photos of the piece as I've started to sculpt her clothes and  shoes - which I enjoyed tremendously.

Monday, May 14, 2012

Standing woman figure sculpture

I'm back from my trip to Brookgreen Gardens in South Carolina where I attended a sculpting workshop by John Sherrill Houser. If you have the chance to visit Brookgreen, the grounds and sculptures on display are lovely and I wished that I had more time to really take it all in. The lighting, however was very difficult to work under, a combination of small spot lights and skylights. When the clouds drifted in the lighting was reduced. We had a week-long pose with a wonderful model that we worked from and the last day, we had the model bring in some dresses. I have been wanting to work on clothing so was pleased that the class agreed to this approach.

 We had and armature and board and were sculpting using Chavant's Le Beau Touche. I've worked with Chavant clay before and it's quite good. Brookgreen had a warming box and when warm, it is easy to manipulate.

I would add, however, for the way that I work, I think that this clay is better suited to larger pieces. Since we were working with a 16" armature, the clay was a bit soft for my style of working. At a larger size, I would think it would be well manipulated by fingers and would work quite well. It did stick to tools quite a bit and I found that I had to keep baby wipes handy to to clean my tools down quite a lot.

The images shown here are at the end of day two and I have probably about 10 hours of work.

Tuesday, February 28, 2012

It's a matter of balance...

 I let this piece rest a bit as I finished up my latest book, "Bully Goat.". I'm glad that I did too. There was something about the piece that wasn't quite what I was looking for and needed the time and distance to mull it. I am trying to achieve the same sanguine feel of "Ascension" but there is a fine line between calm relaxation and stagnation of a pose. I came to the conclusion that the the pose was looking a bit too much like she was levitating instead of rising...there wasn't the balance of dynamic tension that I needed.

So I began to smush, cut, twist and turn until I got a pose that still is sanguine and relaxed, but now has some forward energy. The woman is leaning slightly forward as she ascends and the fabric that will be her support is going to trail backwards, giving a bit more movement.

I'm very glad that I decided to do this maquette (clay sketch) before going to final art, as it gave me the opportunity to practice and work out some problems, which will allow me the pleasure of pure sculpting on the final piece next week! I am going to take "State of Grace" down to my foundry and base shop tomorrow to have them verify that the balance of the sculpt will work in bronze and get some base ideas too. I'll also have the pleasure of picking up my first two finished bronze "Ascension" pieces!

Next, I'll be off to the hardware store to get a few odds and ends to finish up the armature before starting the final 18" version of "State of Grace".

Below is the newer pose with more dynamic tilt to her body and flow of fabric behind her:
Here is the original pose. While I liked how quite and relaxed and in repose she was, I was concerned that the overall feeling was more of stagnant levitation instead of active ascension. What do you think?

Sunday, February 5, 2012

Refining the clay sketch maquette "State of Grace"

 I spent a little time refining the forms and attitude for this clay sketch. It is next in the series that I'm doing of rising women. The first, "Ascension" is nearly finished in bronze and releasing very soon. This sketch in clay is a study for the next to go to bronze. The simple armature is 12" - about the same size as "Ascension". The final for this sculpt will be 18" using the smallest of the TruForm armatures.

Overall, I'm pleased with the direction that this is taking, but will change the hair and cloth a bit on the final. I'll be taking this sketch down to Art Castings to have them look her over for any casting problems before I start the final. I'll also take the sketch into the Base shop to get some ideas before I go to sculpt that may change the fabric and the overall height. Once I've had a chance to discuss this piece with my bronze team, I can begin working on the final clay to size.

This piece will be titled "State of Grace". 12" armature - but with hair and cloth she is currently 18" tall.

Thursday, January 19, 2012

Refining clay sketch maquette

I got a little more work in on the clay sketch - refining shapes and forms a bit. This is Chavant's LeBeau Touche' HM (High Melt) plastelina oil based clay. As it's softer than my J-Mac Extra Firm, it's proving to be much easier to work quickly and the softness of the clay (when warmed under a light) makes it much more malleable. I originally started working with Chavant High Melt nearly 20 years ago when we lived in Sarasota and Placida Florida. At that time I was doing a lot of bas relief sculptures for Image Creations of Florida and found that the HM was the safest clay for me to use in my studio and then transport in the high Florida heat to my client's offices nearly 2 hours hot drive from my studio. Other clays would sometimes literally melt in my car during the commute.

So if you work in a high temperature climate I would highly recommend Chavant's HM (High Melt) clays for your use.

Tuesday, January 17, 2012

Maquette - clay sketch for next scuplture


While I have my 18" Truform armature set up and ready to go, I'm still working out the pose in my head. I decided that some sketching was in order but instead of breaking out the sketchbook, this time I decided to sketch in clay to work out some of the mechanics before I go to finish.


Anyone who know me know that I am an unlikely mix of spontaneous impatience (I want to get started NOW!) and relentless perfectionism (it must be as good as in my mind - no better, Better, BETTER!)


That can make for some frustrating work habits. So I'm killing two birds with one stone - starting work NOW and accepting that it can't be perfect because it's only the maquette (small clay sketch).


I am using an inexpensive 12" wire armature and some old Chavant LeBeauTouche HM plasteline. While this plasteline is perfectly fine, I do like Jmac quite a bit too. Since the LeBeau is softer than my extra firm Jmac, I though it was a good choice for clay sketching - it is quicker to warm up to workable consistency and softer/easier for my hands to manipulate, facilitating a faster, looser approach. Hopefully that will lend more life movement to the sketch and yet make it easier for me to stop at a less-than-finished state and then move on to my 18" final model, using the sketch as my reference.

Monday, January 16, 2012

Preparing board and Truform armature

 Time to get my new armature ready. I went to the hardware store and got my flange screws. After deciding the placement for the armature, I marked the board, pre-dilled the four holes, then screwed the metal flange in place.

Next I attached the metal armature rod from my 18"Truform armature. I bought this a while back, but have been busy working on other projects and haven't had the chance to try this.  The head is removable but the rest of the armature is not. In the larger sizes, you can take off the arms and legs, allowing you easier access to work on the sculpt - a real plus in certain poses.

I do know it was very tricky trying to get to certain areas with my "Ascension" so it would be beneficial to be able to take the arms and legs off of this armature. Since that isn't an option on this size of armature, I've been experimenting with creating my own system for making the extremities removable. So far 3 of my four designs failed, but the 4th is showing some promise, so I will do further experiments before starting this sculpt.

This will be a new experience for me, as I made my own armature using multiple aluminum wire for "Ascension".

Also, as I had some difficulties with the hands getting bumped, I'm building some wire armature hands to put on this piece, which may be very helpful or just a big pain in the butt - time will tell.


Thursday, January 12, 2012

Getting Jmac clay ready for next sculpt


Time to prepare for my next sculpt. This one will be done in similar style and fashion as "Ascension", however I'm trying out a new armature, which I'll be showing later.

I spent a week purging my studio of past projects and art supplies that I'm no longer using. The local people on Craigslist are very pleased about that ;-) Still needing to improving my lighting for sculpting, as it's imperative to have good, strong directional lighting to cast shadows on the sculpt to reveal the forms. As I do most of my sculpting standing - or even standing on a stool for added height, I need a light that I can move around as needed - plus my ceiling is rather low (basement studio) so I don't have a lot of hanging options. I'm thinking of getting a boom for photo lighting and clipping a light onto that. It would be useful for lighting and photographing the sculptures later too.

Time to get my materials ready to work. Every artist has their own methods of working. David Lemon (check out this guy's blog - it's delightful to watch him work and his sculpts are crazy good) likes to chunk his clay into pieces using a knife. I suspect he's bigger and stronger than I am, plus my Jmac clay is extra firm. I think it's left over from when I was living in Florida and needed something that would say firm even in high heat.  I can't possible cut through it. This may be way firmer than I will like working in for a figure, but want to try and use it up before purchasing another block in a less firm formula. So instead of trying to cut pieces off the block, I place a lamp on it to warm and then shave pieces off and collect them into a foil lined box. This box has a lid (great for keeping out dust and hair) and the foil helps hold and reflect the heat from the lamp to warm the clay. The small strips warm up very quickly compared to larger sections. I can then easily mush the strips together into manageable lumps for easy grabbing later as I'm sculpting.


Time consuming and a bit hard on the hand, but will make the actual sculpting process much smoother so worth the time and effort now.

Friday, December 23, 2011

Wax Chasing & Lessons learned


I worked on the first two wax castings of "Ascension". The folks at Art Castings were very helpful and Mac did some good work on the chasing. However, he was working blind, as he got her in pieces and had no real idea how she went together. Can't imagine doing that! So I learned that it's a good idea to provide a series of photos for them to work from.

Another issue was that there was some confusion over how the bronze was to be mounted onto the base. Since they didn't have a photo, they thought it was one way and realized that there wouldn't be enough metal to support the floating woman.  In reality, there was, mounted the way I had planned. So I had to go back and carve out all the wax that they had added.

Never worked with wax before so after a few hours at the foundry, I decided to pack her up and take back to my studio, since it was taking longer than I thought. You can see my desk with the various tools. The hot tool that is plugged in on my desk proved much too hot to use on the sculpt much. It vaporized the wax and melted much too aggressively to be much use to me. So I kept it on and placed my metal tools on the hot tool to heat the metal carving tools. That worked much better, overall.

It still took many hours, but that is mainly due to my inexperience and I'm sure it will go much faster next time. I may even chase the entire wax next time to gain even more understanding of the practice and to familiarize myself with what casts easily or harder to incorporate into my next sculpt. After finishing her up I took her back to Art Castings. Luckily for me, Jeanne too a look at the photoshopped image I had made explaining the mounting process - she didn't think it would work - that the stone would chip!

So I buzzed over to the Base Shop and spoke with Brian. Thanks to Brian and Jeanne, we were able to come up with a solution that will enable me to mount the sculpture as I had planned, with a bit of extra effort, and another lesson learned!


Tuesday, December 13, 2011

Wax pour for "Ascension" Bronze casting


It was quite foggy this morning and I nearly postponed my drive down to Art Castings in Loveland. But, since I'd already filled my travel mug with hot tea and charged up my camera, I decided not to wait and I'm quite glad!

When Jeanne greeted me, she knew just where my work, "Ascension", was in the maze of other sculptor's molds and waxes. They had just poured the first two waxes and Mac was starting to chase them.

In the montage photo:

1) collection of rubber molds inside the mother-mold

2) the mother mold encasing the rubber like a clamshell

3) you can see that the rubber comes out of the shell

4) the mother mold seams together tightly

5) hole where the wax is poured in

Here are some photos of the hollow wax that was poured. Mac is working on taking out imperfections in the wax. He will also fix where the armture came through. When he reaches a certain point in the process, they will call me and I will head down to spend the day doing finish chasing and detailing until I am satisfied before preparing the wax for the bronzing process.


You can see the whole process of making a bronze at the Art Castings site http://artcastings.com/casting-process.htmlhttp://artcastings.com/casting-process.html


Monday, October 17, 2011

Ascension Figurative Sculpture is at the foundry! ~Lori Kiplinger Pandy's first bronze

After some delay, my sculpture, "Ascension" has been delivered to the foundry at Art Castings of Loveland! They will be making a multi-piece mold of her. Then they will cast her in wax. Next they'll chase the wax. After that, they dip her into plaster and sand many times over a period of a week or more. Finally they'll melt the wax out of the plaster shell, then pour in the molten bronze. After the bronze cools, they'll smash off the outer shell to reveal the bronze pieces.

Finally, they'll assemble the pieces and weld her back together and chase all the seams. Last of all they'll apply the patina, giving her the final colors and attach to her stone base. Each an every bronze sculpture will require this process:  from pouring the wax to attaching the base!

She measures approximately 10" tall (without base) by 15" long and 6" wide. She will be supported only by the fabric that drapes from her hips. The fabric will pool onto the base, flow over the edge of the base and onto the table."Ascension" will be an edition of 33 plus several Artist's Proofs. Number 1 of 33 has been pre-sold already!

If you would like to see the entire actual process of developing a bronze from mold-making to final patina, you can view the short video from Art Castings here.

 The entire casting process will take about 10-12 weeks. I have to study some patina choices but I have something very specific in mind and will post that soon.

I must say that I am very excited to finally have her at the foundry. Being somewhat OCD about my work, I have a hard time letting go ;-)

But I must say, I loved, loved, loved, sculpting her! Even when a mishap came along to destroy
her hand or her face, I had just as much fun sculpting her again as I did the first time. In fact, the sculpting itself was very rewarding and relaxing. The hardest part of this sculpture was learning about armatures and the ways of working with this particular medium, Jmac Classic Clay.

I learned so much from working on this sculpture and am looking forward to using that hard-won experience on the next piece.

Once the sculpture is final, I will release the retail price along with the new photos.