Showing posts with label modeling. Show all posts

Friday, June 15, 2012

Refining the pose

 I've been a bit preoccupied with the High Park Fire near here. It's been very smokey and some of our friends were evacuated. The fire is over 50,000 acres but the firefighters have been amazing and we're at 15% containment - if we could get some rain and a break from the winds....

We've spent the past two years renovating a little log cabin by the Poudre river in the mountains. We only just got the new well, pump and bathroom installed, not to mention all the work re-chinking and a huge amount of overall repair. Hoping it survives this fire.

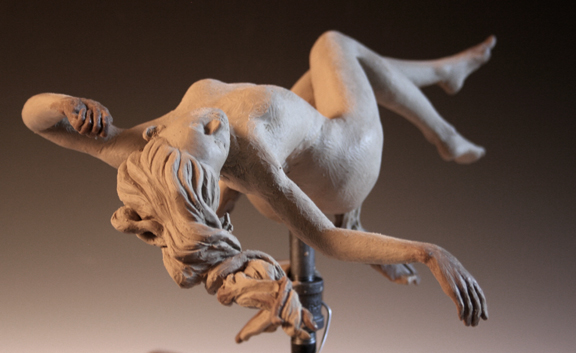
So - on to work. Have I mentioned I'm not in love with this clay? Chavant makes wonderful products and Le Beau Touche is one of them - however it takes the right clay for the right job and my opinion is that this clay is wonderful for larger scale works. At 1/5 scale its too soft and creamy but I can see how those attributes would be delightful at a larger scale and much easier on the hands. I'm sure that I'll enjoy using it again when I work larger. For now, just trying not to squoosh all the hard work.

I've been refining all the areas that I had to recreate after the shipping disaster. You can see that I have taken her hand off to sculpt separately. I added a bit of wax to the clay to resculpt the hand to make it a bit firmer. Still working out some issues on the dress wrinkles and need to get her other sandal sculpted again. Have fallen way behind. My original goal was to have this finished and in bronze for the Loveland Sculpture Invitational, however with the major setback of having the resculpt without the model, well, that's simply not going to happen. Moldmaking takes several weeks and bronze another 10-12 weeks. How disappointing.


Thursday, May 24, 2012

Re-sculpting the figure

 Well, I had my time to pout, eat chocolate and have a glass of wine. Then it was off to the hardware store for supplies and home to start re-sculpting the smashed figure.

First I had to fix the armature base and reassemble the rod. Next I cut the clay off her legs from the knee down where I found that the wire was badly bent and rounded. Then I took pliers and straightened out the legs.

Then I cut her head off at the clavicle. The entire neck region had smashed and reworked the armature there before putting her head back on and lengthening her neck back into proportion.

Overall the entire figure rolled around in the box, so everything was a bit compressed, so I spent some time getting her stretched back out a bit.

Finally, I put her back onto the armature stand and started to put the clay back on her and begin the process of resculpting the figure. I started with giving her new feet and legs, then pulling out her right arm and working it and finally, starting to give her a face again. I'll try and get a little more done today and tomorrow but then will be out of my office for the holiday.

I'm still very unhappy about the shipping accident, but it feels good to start making the repairs - I was very excited about this sculpt and am looking forward to continuing the work.


Thursday, January 19, 2012

Refining clay sketch maquette

I got a little more work in on the clay sketch - refining shapes and forms a bit. This is Chavant's LeBeau Touche' HM (High Melt) plastelina oil based clay. As it's softer than my J-Mac Extra Firm, it's proving to be much easier to work quickly and the softness of the clay (when warmed under a light) makes it much more malleable. I originally started working with Chavant High Melt nearly 20 years ago when we lived in Sarasota and Placida Florida. At that time I was doing a lot of bas relief sculptures for Image Creations of Florida and found that the HM was the safest clay for me to use in my studio and then transport in the high Florida heat to my client's offices nearly 2 hours hot drive from my studio. Other clays would sometimes literally melt in my car during the commute.

So if you work in a high temperature climate I would highly recommend Chavant's HM (High Melt) clays for your use.

Saturday, August 13, 2011

At the Loveland Sculpture Invitational Show...

Sculpting is calming and freeing for me. So I brought my working in progress, "Ascension", to the show to give me something to do.

Thanks for Mr. Tom Carter for snapping a couple of pix while at my booth today!

"Ascension" is getting a nice reception from the patrons and I'm really excited about finishing her next week and taking her down to Art Castings of Loveland to start the bronze process.

In the mean time, I was happy to find a new home for "Hint of a Smile" today. She was purchased by a lovely lady from Texas. It was satisfying to see her pass my booth, pause and declare, "She's mine!" Makes one feel really good to have created something that she really connected with.

The show is amazing, of course I've known that from visiting it, but from an exhibitor's prospective, I can see that it is beautifully run and the volunteers are the best.

Looking forward to what tomorrow's show brings!


Sunday, June 26, 2011

Figure Sculpting Demo - young dancer in ceramic clay #4

Last post today. Would have preferred to go further, but hubby just got home and the last of my Studio Tour visitors recently left so will call it a night!

Having people come to the studio and sculpting in front of people was a fun experience! Though I didn't get as much sculpting in, as I stopped often to talk with people and show them around, I feel like I've got a good start to this sculpt. I'll let her firm up overnight and get back to work tomorrow. Plan on trying to have her done by the end of the week so check back to see her progress....

Thanks for visiting everyone - I had a great time at the tour and plan on doing it again next year. I think I'll book a model and try to compete a figure pose over the two days next year....

Thursday, April 21, 2011

Ceramic Sculpture turban wrapped woman

Finished sculpting "Hint of a Smile" today. This is water-based clay called Chestnut that I purchased from Mile-Hi Ceramics. It's rather groggy but that can be interesting. This one dried a little faster than I would have liked, due to my deadlines for illustrating my book - so there are a few cracks in the turban. However, that too, may end up being a desirable thing - won't know for sure until it's fired.

I will consider using some epoxy to put in the suggestion of a pupil highlight after firing also.

With the eyes hollowed out, there is additional venting for the sculpt. I'm hoping that offsets how thick the turban ended up. I did cut her in half and hollow her out but added the turban later so that part is fairly thick.
This sculpt is just under life size. I'll post again with her after firing.


Saturday, January 15, 2011

Miniature Fox Sculpture mold making

I took the miniature fox that I sculpted in December and made a mold (often called a pour or dump mold). I used Dragon Skin mold-making products by Smooth-ON.

 1). Dragon Skin is a 2-part silicone mold - you mix equal parts of A + B. I also used Liquid Gloves - it forms a barrier to protect your hands from absorbing chemicals or paint - it feels nice, goes on like hand lotion.
2)  I cut the bottoms off of two plastic cups to form a cylinder around the fox sculpture. I put a small bit of clay on the bottom of the fox sculpture to help it stay in place, then put the cups over it and sealed the bottom of the cups to the base to keep the silicone from leaking out.
3)  I also put the whole thing on a small tray in case it leaked - but this time I sealed it well and nothing leaked out.
4) Mixing Parts A + B
5) Poured into the cylinder and curing (left it over night)
6) I took this to class and my instructor, Rik Sargent, helped me to cut the cured silicone on two sides on a diagonal to get the clay out.


Friday, January 7, 2011

"Ascension" Oil clay figure sculpture work in progress


I'm very excited about my first oil-based clay figure sculpture. It's the first time I've used a wire armature. This is loosely based on a life pose from the Art Students League class that I took under Rik Sargent recently. I'm still getting used to the Classic Clay - rather sticky feeling in comparison to water-based clay.

You'll notice that some of the hands, feet, hair and cloth are a darker color. Rik showed me that you can mix casting wax with the clay to make a much harder clay mix that can hold smaller detail better than the oil clay alone. So even though I had fully sculpted her hands and feet, I cut them off, re-sculpted them using the wax/clay mix and reattached them.

Because I wasn't really basing the sculpt on any particular pose from the model, it changed as I aggressively manipulated the figure for more drama - thereby exposing some of the armature wire in the process. In addition, the pipe supporting her is also in the way. I will be making a mold and casting this piece in wax. Once I have the wax, I'll be able to sculpt away the imperfections caused by the wires and post.

Finally, I may make a mold of the wax and take it to the foundry for casting my first bronze. When she's complete, the flowing cloth will be her only support - she'll appear suspended in mid-air, caught in the moment of ascension.

Rik has generously offered to help me through the steps working with moldmakers and the foundry. If you ever have the opportunity to take a class with Rik DO IT! He's a very giving and inspiring sculptor and teacher!

Monday, July 12, 2010

Forton Metal Patina

Whew....been a long time since my last post. We've been renovating some buildings and our house so time has been detoured.

Due to snow, I was only able to make a couple of the patina classes with Andi at the Denver Art Students League. The photos won't be very good, as I don't have a place to set up for photos at the moment. Hopefully I'll be able to get some better ones, with bases, up soon.

This sculpture had a base coat of Forton and bronze/brass metals. Then I used a mixture of several different oxides and patinas from the class. After the metal had oxidized, I buffed with a bit of steel wool to bring back the metal. It came out a bit darker than I had anticipated. I do think I like it overall.


Tuesday, March 9, 2010

Plus-sized nude model

We had a plus-sized model this week. Again, I had just a little over 4 hours with the live model. I took the sculpt home and worked another 7-8 hours from memory - including time to cut her into pieces, hollow out and reassemble.

I was too excited to start sculpting and forgot Andi's paper cores...I started sculpting her solid and once I'd gotten a ways it was too late to turn back. So I went ahead and sculpted solid for a little while, then cut her into three pieces for hollowing out. I'll be sure to try and be more restrained on the next piece and really try to get the paper core down and this time, with thicker walls of clay to better support and have less problem with paper coming through to the surface... ;-)

The large model was a new challenge for me. I've never worked with heavy models before and the mass and weight and gravity were new and interesting. It was a different way to sculpt and see things since I usually work with more muscular or thinner more angular figures.

Another area for me to work on is my photography. Granted, these were done quickly to document the stages of work, but the photos aren't very good. Hopefully I'll get some better photos done when I fire and do the patina.


I also wish that I was able to keep the freshness. I'm at war with myself; one part of me wants to really work out the anatomy and the other part of me wants a looseness and spontaneous feel. While I like the mass and roundness of this piece, I think I missed the mark with going for a more artistic feel. I think that having to cut into pieces for hollowing and then repair the damage from the cutting encourages me to get too fussy over the finish and obliterates the stokes and marks of the clay - making it too 'rendered'. Well, there's always the next one...always the challenge...


Thursday, March 4, 2010

Nude and Drapery Sculpture Study


This week, at the sculpture class with Andi Mascarenas at the Denver Art Student's League, we did a nude study using some drapery. I had about 3 1/2 hours with the model and then continued the work at home for another 4 hours. The drapery was challenging, as every time the model took a break the drapery was different when she came back to model. I had the usual challenge of the paper core coming through and a few places where the wall of clay was very thin. When I got the sculpt home, I endeavored the remove the paper and had quite a bit of breakage that needed repair. I think it goes to show that I'm starting with the wall of clay too thin from the start, so will try to correct that problem on the next sculpt.

Another problem that I encountered was slumping. Because we're trying to work so fast, since we have limited class and model time, there isn't enough time for the clay to firm up much before we sculpt. I found that the weight of the top part of the sculpt was causing the bottom, her legs, to smash down. In order to correct that problem, I had to add more paper and then more clay to the base in order to bring the overall height back up. Unfortunately, I also over-corrected for that slumpage and you may notice that her lower torso is elongated. The proportion of the lower torso being too long isn't terribly unpleasing, at least to me, which is surprising since I tend to be a perfectionist.

But then, that is something that I've been working to overcome and one of the main reasons that I'm taking Andi's class. Good art isn't perfect. It's beautiful or evocative, or interesting, but not really perfect. So I'm trying to force myself to produce a lot more art and to learn something from each piece and to try to find the interest or emotion, or thought for each one, instead of the exact reproduction of what is already there.


Tuesday, February 9, 2010

Continuation of figure study


I spent another four hours refining the sculpture study - which may or may not be a good thing as I was working from memory and not the model. In that time, I found myself carving away quite a bit. Probably it would be much better for me to be working additively, instead of subtractively, but it's a learning process. By subtracting the clay, I found that I often went too thin and broke through to the crumpled paper. I would poke the paper down with a tool and add more clay, but knew that the thin walls could be a problem.

Well, that was an understatement. My next mistake was trying to remove the paper and hollow it out too early. Not having much experience with water-based clay, I was worried about it becoming too hard to repair when the time came to cut a hole and remove the paper. So in I went, through the bottom of the sculture. The first wad of paper wasn't a problem, but cutting up through her legs and torso, I found that the clay was easily punctured and holes formed where it was very thin at the junction of the legs and seat. Additionally, since the clay was far wetter on the inside where the paper was, the torso broke open around her belly and that ripped her arms off at the wrists. Ouch! Lastly, since the clay was not firm enough to support itself without the sticks and paper, I found some slumping and sagging. Most noticeably in her repaired support arm (It's a bit bowed now) and her folded leg (which collapsed a bit without the paper inside so is a tad flat).

Lastly, I'm a bit concerned about being overly fussy and loosing the freshness of the study. I think that comes with removing clay more than adding it, something that I will be trying to address in my next study.

Overall, not bad for a first attempt and I'm really enjoying the class and the medium. I totally loose track of time and become lost in the moment of the art. I stand for 4 hours at a time without real pause and never even notice that time has moved. In fact, I do feel a bit grouchy that I must stop at all ;-)

This isn't necessarily a good thing. Great art can be done quite quickly when it's inspired and when trained and experienced eyes and hands are working well together. Sometimes spending a lot of time on something is simply fusssing and noodling and doesn't improve the piece. But I figure that at this point, you gather that training and experience by practice - sometimes that piece will work well and improve, sometimes not - but it helps to improve your work over the long haul - and that is my ultimate goal.