Tuesday, October 1, 2013

Mystery Person revealed: Frederick Douglass

Many people on my Facebook Page guessed correctly. The mystery person is Frederick Douglass. The clay sculpture of Frederick Douglass is nearly finished. The clay will continue to firm up to the leather hard state and I'll make a few minor additional touches as this happens. It will need to dry to a firm state to allow me to cut the sculpture in half and begin the hollowing out process that will allow me to fire it in my kiln. This life-sized piece will take a month to dry enough for firing. Once hollowed, I'll slip and score the edges, reassemble and repair the surface.

This clay is slab and sculpture and tile and sculpture cone 10 water-based clay with a heavy grog.


Friday, September 20, 2013

Mystery Sculpt continued - blocking in the clothing

The mystery person is taking shape. I began to rough in the clothing. The head was quite heave so I cut off the top and did some early hollowing. I will need to hollow much more next week when it firms up. It's tempting to finish more, but I know that the process of cutting the sculpt open, hollowing out and reassembling will invariably lead to some damage, so I'll resist finishing it much more until the piece is leather hard and ready for that phase.
Since I was using us some Slab and Sculpture clay, I didn't have any more of that particular clay to finish the clothing. I was able to get something quite similar called Tile and Sculpture from The Stone Leaf Pottery in Arvada, CO - a bit over an hour drive from my studio. The folks there were very helpful and I was able to get this clay (cone 10) and several other bags to try out on my next sculptures. While the heavy, sandy, groggy texture of this clay is nearly identical, the color is a bit darker red. That won't matter when I do the patina, however so isn't a concern.


Tuesday, September 17, 2013

Continuing the portrait

 Today was one of those days - modem was coughing and sputtering and finally gave up the ghost - second time in 8 months - I spent several hours trying to get a different brand but alas, this one is the only one in town for dsl.

So even though I've gone through two of these already - I had to exchange it for the same model....and know that it will probably go the same way as the first. Will be giving some serious thoughts to new ISP if this keeps up.

Anyone out there know of a truly reliable DSL that will play nice with my Airport?

I did some refining of forms, but my time was broken and that makes it less productive. Tomorrow I should get some real time into the piece and perhaps get a chance to start blocking in the clothing too.

Any guesses as to who the person his?


Monday, September 16, 2013

New portrait sculpture bust started - guess the person


I started a new sculpture portrait bust two days ago. My camera wasn't charged, so the beginning photos weren't taken, but I followed the same working method that I used for "Harriet Tubman - Fierce", and "Old Soul".

First I created an armature and then padded the head area using balled up newspaper covered in tape, then I covered the newspaper with clay about 1/2" thick. Then I wadded up more newspaper to form the shape of the shoulders and upper chest and covered that in clay. Next I began blocking in the forms.

The clay that I am using is a water-based clay with a very high grog and sand content called "Slab and Sculpture" that I purchased from Mile High Ceramics (now closed) in Denver. This bag of clay had been stored for quiet some time and had gotten very hard. I poured a cup or two of water into the bag, sealed it inside another bag and rotated the bag every day for two weeks. This allowed the water to soak through the clay evenly and become usable again. I may not have quite enough to finish the entire bust, so if necessary, I'll use a similar clay for the clothing.


The clay is very strong and heavy with low shrinkage rate but the very rough nature of the clay takes a bit of getting used to. Don't think you can used water and make a slick and shiny surface, you really can't. You can burnish it, to make the surface smooth if that is what you desire, but a clay with this texture begs to have the texture used, not hidden.

This sculpture is life-sized and will be a bust with some shoulders showing. I'll continue to post the progress and in the mean time, feel free to leave comments guessing who the person is - people will be guessing on my Facebook Page also. I'll post the name at a later date....

Friday, July 26, 2013

Using the proportional calipers - a lot!

 Clay is so malleable that it moves constantly while you are working. If you spend more than 30 minutes in any given area you are practically guaranteed that you'll be ripping off that work later when you find mistakes. You must step back and turn your work constantly - no zoning out on one small section because as the clay moves it effects other areas and distortion sets in.

I'm constantly grabbing my trusty proportional calipers and double checking my measurements. While work like this figure is a figment of my imagination and I have no actual model standing there to reference, I do refer to anatomy books, charts and a life-sized skeleton that I keep in my studio.

Additionally I will sometimes take measurement of myself as a general guide - if my sculpture is an adult female, that is. Naturally that won't work if I'm sculpting a man.

Here I am taking a measurement of my forearm near my wrist using the larger end of the calipers. I'm working roughly at 1/4 life size (this sculpt is about 16" tall - 16" x 4 = 64" tall, or about 5'4" tall. I'm about 5'5" so I'm a good fit for measuring this particular sculpt). I have the the calipers set to 1/4 scale.

Now I simply flip the calipers around and use the smaller side to measure my sculpture's wrist. I do this often as I work to be sure the proportions are working.


Thursday, July 25, 2013

Feminizing the forms - more blocking in of muscle mass

 Today I began to refine the muscle shapes and feminize the entire figure. I gave some basic contouring and features to the face and continued blocking in the muscles and forms of the body.

I must say that I am really enjoying the Clayette clay by Chavant - creamy without being too sticky.

Wednesday, July 24, 2013

Continuing to block in the musculature

 I continued blocking in the musculature today. I laid in the basic muscle shapes over the skeleton and then began to put in the beginnings of the face. It's hard to stop at this stage because I can start to see the sculpt taking shape and want to continue.

However, taking a break for dinner and sleep is advisable. When you look at the sculpt again first thing in the morning after some time away you can see areas that need work or correction. Not rushing things always makes better art - but I'll be the first to admit that it's very tempting to put in the artistically pleasing things, like details and hair, long before it is time to do so.

Patience and persistence really pays off. If the sculpt looks good without all the extras, then it's stronger and more beautiful overall.


Laying in some muscle mass - continuing the work on building the figure

 Sorry I skipped a step - I photographed the last of the skeleton but the photos didn't come out well enough to post. So here I have finished the simple skeleton and have progressed into laying in some of the major muscle masses.

As the finished sculpture is not an ecorche study, I am not concerned with making every muscle with attachments and origins. My goal is to lay in the shapes and forms of the muscles that most effect the surface.

I am using Chavant's Clayette in Hard for the skeleton and hands and Clayette Medium for the muscle mass. I will also use the hard for the face and hair as this is a small scale piece.

You'll notice that the hands look a bit big in the beginning. This is because there is little muscle - mostly bone and tendons in the hands and feet whereas the legs and arms have a lot of muscle and fat. When you strip the figure of a lot of the muscle and fat - the hands will look larger in proportion to the overall figure. As I flesh out the rest of the figure you'll see the hands and feet will look more normal with the larger forms of the legs, arms and body to balance things out.

My husband just walked by and wondered aloud if all this skeleton and muscle work was necessary and wouldn't it be easier and faster just to glob it on? Short answer - yes and no. Sometimes I do just jump straight to large masses (outer form of skin) and quickly set things up. But taking the long road (bones and muscles) does things for a piece of art that just can't be achieved any other way.

Wednesday, July 17, 2013

Scupting the skeleton


Now that I have completed armature it's time to block in the bony structures. The goal here is to claim the anatomy space and landmarks. I'm not displaying a skeleton as my final art so I'm not concerned with making a complete replica of a skeleton, nor will I sculpt every knob, spur or fossa. The purpose of this is to very sure of my proportion and to control the overall line and movement of my sculpt. Tedious though it is to sculpt a plate and a ball and socket, it will pay dividends later.

Using my proportional calipers I am able to compare relationships between skull and other parts of the anatomy to be sure the piece is working in harmony. I may choose to take liberties but these are conscious design choices and not guesstimations or accidents.

This time I also did an additional step of creating removable forearms. I used a rotary tool to cut square brass tubing and then cut the forearms up near the elbow joint. I used a two-part epoxy to secure the square tubing by inserting the upper arm into the tubing 1/2 the length of the tubing. Once the epoxy set I was able to put the forearm in the tube until it meets the upper arm. This will make it easier to remove the arms from the body to sculpt the hands.
 Once I finish blocking in the skeleton, I'll start massing in the muscles and flesh.

For this sculpt I'm deviating from my usual jmac classic clay and trying out Chavant's Clayette in Hard. I love Jmac but it's always nice to try new things. Many clays are good for different reasons - some work better for small works and other for large works. I've used JMac as my go-to clay for a lot of my work and while I liked Chavant's Le Beau Touche but found that it was too soft for my smaller work. That doesn't mean that it's not a great clay - it just means that I may have a heavier hand, or that it is better suited to larger works where the softness is an advantage.

When it comes to clay, you can read reviews and see what other sculptors are using but ultimately it comes down to personal preference and you'll need to get your hands on some to try out for yourselves. And, like me, you will probably find several that you love and have specific applications for.


Friday, July 12, 2013

Making changes and corrections to your wire armature

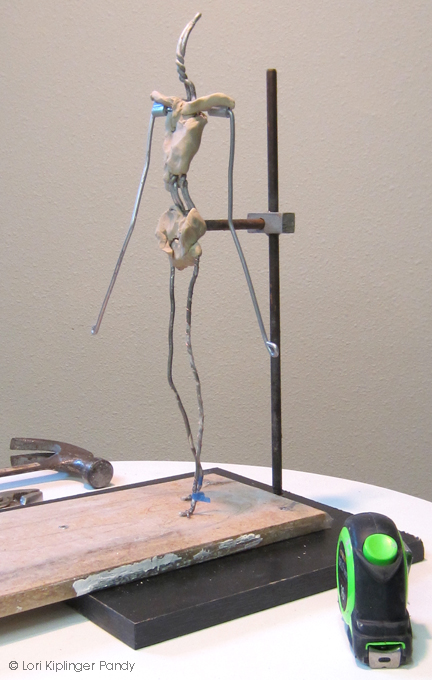
 Once the armature was very secure and those feet firmly attached to the board I began laying in some clay on the wire to create a simple skeleton framework. A guest to my studio was curious as to why I would go through the work and trouble to do this as it will all get covered up later. One major reason is that proper anatomy begins with the bones. If the bones are wrong, the rest will be wrong too. Placement of major bony landmarks helps the artist create the forms of the body and by starting with the basics, you have a firm foundation. It's also much easier to see and correct problems before you get too far along in the sculpt.
In this case, I found my problem rather quickly. By using some of the leg wire to firmly attach the armature to the base (and allow space for the clay ground upon which she stands) the leg armature was shortened. Not dramatically for physical accuracy, but as an artist I can take liberties to create the art as I wish, rather than is average. In this case, I want my figure to be a more balletic figure of 8.5 heads. By roughing in the bones I immediately detected that the legs were going to be shorter than my desired length.

A quick check with my proportional calipers confirmed my eye and I set about deciding how much I needed to lengthen my leg wire. I decided that the best place to add wire is to the femur, as the upper leg has more muscle and fat. So I cut the wire at the upper part of the leg and raised the torso bolt up the support pole to create a gap where I cut the wires. I now had lower legs attached to the board and the rest of the armature hovering above the lower legs.

Then I took a smaller gage aluminum wire and cut it longer than the gap separating the legs. With floral tape, I secured the new wire to the armature and then wrapped with fine gage copper wire to firmly secure to existing armature wire.

Once the wire was wrapped, I mixed a two part epoxy putty and covered the femur - once cured the new armature area is stronger than the original - the lengthened leg addition is now exactly what I want and the armature has been altered to meet the needs of this particular sculpt.
Remember - you can create your own armatures or make changes to store-bought armatures at any time to suit your style and tastes.
(Oh - and if you are wondering about the toothpick - that is marking the Suprasternal notch - another useful landmark....)


Monday, July 8, 2013

"Waiting on the #9" wins 3rd place sculpture at 43rd WAOW Exhibition

Lori Kiplinger Pandy's bronze figure sculpture "Waiting on the #9" won 3rd place for sculpture at the Women Artists of the West 43rd National Exhibition. (WAOW)

"Waiting on the #9" depicts of a young woman, sassy purse dangling from one finger. It is a study of a casually confident commuter, waiting for the train. I created this sculpture following a trip to Switzerland where I enjoyed the tremendously efficient public transportation and the cavalier attitude of seasoned travelers.
This was an amazing show by the Women Artists of the West. I had the opportunity to meet, socialize and talk shop with some of the top artists in America. I was honored to have been juried into such a prestigious show and even more honored to have my bronze take third place for sculpture. Artist Karen Vance was the judge of awards and was generous in giving advice to any artist who asked and graciously shared her time and experience with us all.

This year the high-caliber show is being held in Estes Park, Colorado and runs through July 28th, 2013 at the Cultural Arts Council Gallery in Estes Park. (http://www.estesarts.com/)

"Waiting on the #9" © Lori Kiplinger Pandy - bronze edition of 20
$2500 (shipping $35 - please contact for shipping quote to countries outside of U.S.)

Wednesday, July 3, 2013

Sturdy armature for new sculpt

 Excitement and enthusiasm for sculpting is a wonderful thing. Impatience is not, however. I've had a few occasions where my excitement over starting a sculpt when I didn't have all my materials ready led to trials and tribulations later.

This time, I'm spending more time in the prep phase which is going to pay off in spades later when I get to real sculpting adventure.


On my last sculpt, "Loss" (working title) I didn't secure the armature 'feet' firmly to the base board, which meant that with jarring, came shifting. Any kind of movement of the armature can create problems and an armature that is weak or prone to movement can wreak havoc on the work.

I reigned in my enthusiasm for my new piece, "Joy" (working title) and set about to make the bones of this sculpt strong. I began by drawing out the template on the baseboard of where the clay base for the sculpt and placement of the feet will be, as this will be a companion piece to "Loss" which is currently at the foundry being poured as a bronze.

Next I used my drill to countersink a hole for the washer and nut that holds the vertical post onto the baseboard. Then I created arms using armature wire and wire sleeves and attached the arms at the shoulder. The arms are long at the moment and I will cut the excess off once I start laying in the anatomy. Measure twice and cut once - a wire that is too short is useless.

Finally, I marked where the bottom of the feet will be on the leg wires and then hammered nails over the remaining wire ends to secure them firmly to the board. No shifting! It's a bit awkward looking - you have to keep in mind that there is going to be clay on the base that covers this up and the feet are actually higher up on the leg wire. You can see that I started to wrap some fine gage wire around the armature wires. I don't always do this, but some clays need more to grip onto than just the smooth single armature wire. By wrapping wire I give the clay a lot of area to grab onto and hold tight.

This sculpt will measure about 15" tall by 15" long by 6" wide when complete.

Wednesday, June 26, 2013

Wax off to foundry for bronze

Murphy's Law strikes again. When I started "Loss" (working title) in waterbased clay over an armature I was planning on sculpting quickly and getting her to the moldmaker quickly before the clay dried. Then my publisher called with illustration work and deadline after deadline meant that the clay sat for long periods without work and parts dried and cracked before I could get her to the moldmaker.

Consequently, the mold isn't the best and required copious amount of sculpting in wax to repair. Naturally that is when my thermostat regulator that I use to dial down the heat (on my wood-burning tool that I use for wax chasing) died.

That meant that the tool now had two settings: Off and Vaporize. I do mean *POOF!* - touch that hot tip to wax and it disappears into a noxious cloud. So I spent many hours warming metal tools against the hot tool and then trying to sculpt the wax. Not the best system, but what I had available.

So - the chased wax has been delivered to the foundry and appointments set for the Metal Chaser and Patina Artist to follow - next up is taking he base template into the base shop to have the cut while I'm waiting for the bronze to be made.


Monday, June 24, 2013

New Patina for Harriet Tubman Bronze Bust


I absolutely love the new patina on my portrait bust bronze "Fierce, the Triumph of Harriet Tubman"! Simplicity is my new mantra. The simplicity of the Chinese Brown patina is warm and human and I'm thrilled with the results.

The act of patination of bronze is so very different from my patina of transparent glazes on fired ceramic. I found that what glowed with beauty and subtle depth through glazing on my clay work didn't always translate the same when hot patina was applied to bronze. The color and nuances in hot patina are completely different. So rather than try to emulate my glazes on ceramic, I decided to work in more traditional bronze patinas and have learned that these choices are indeed, the more subtle approach that I love and allow the beauty of the bronze and the tooling of the the sculpture to shine.

Every day is a new lesson in sculpting and how every component impacts the piece, from the size of the sculpt to the choice of clay for expressiveness to the attitude of the subject, the patina that colors it, down to the base that supports it.... all these decisions are so important to the beauty and balance and statement of the final art.

Harriet Tubman, Conductor of the Underground Railroad is being honored in 2013 - the 100th anniversary of the death on an American hero.