Showing posts with label nude woman. Show all posts

Tuesday, July 3, 2012

Beginning State of Grace final

     Starting the final clay for "State of Grace". This time I'm using Jmac Classic clay - medium for the body and firm for the head and hands. I did the maquette a while ago and now that I've finished a few things, it's time to start this one. I'm using the 1/4 scale (16") Truform armature for the first time. So far it's going pretty well. It's nice to have the hips and torso blocked in with the Truform, but I did find I had a few problems with the placement of the support bar. After working on it for a while, the weight of the clay pulled down on the lower part of the body and elongated it out of proportions.

Using my calipers, I was able to tell it was quite distorted, with the upper torso much too long. The weight have pulled down on the wire spine.

So I cut her up and removed her, shortened the spine wire in the torso and re-bolted her back into place. Hopefully I have it tight enough now that this won't repeat.

Because she's floating the weight is more of a factor - if she where standing and supporting her weight it wouldn't happen as much. But I won't be sculpting the fabric support until later. You can look back into earlier posts to see the maquette that I'm working from.

I'll be taking time on Friday and Monday to chase the waxes for my bronze Harriet Tubman and Waiting on the #9 - then back to working on this pose on Tuesday.

Monday, May 14, 2012

Standing woman figure sculpture

I'm back from my trip to Brookgreen Gardens in South Carolina where I attended a sculpting workshop by John Sherrill Houser. If you have the chance to visit Brookgreen, the grounds and sculptures on display are lovely and I wished that I had more time to really take it all in. The lighting, however was very difficult to work under, a combination of small spot lights and skylights. When the clouds drifted in the lighting was reduced. We had a week-long pose with a wonderful model that we worked from and the last day, we had the model bring in some dresses. I have been wanting to work on clothing so was pleased that the class agreed to this approach.

 We had and armature and board and were sculpting using Chavant's Le Beau Touche. I've worked with Chavant clay before and it's quite good. Brookgreen had a warming box and when warm, it is easy to manipulate.

I would add, however, for the way that I work, I think that this clay is better suited to larger pieces. Since we were working with a 16" armature, the clay was a bit soft for my style of working. At a larger size, I would think it would be well manipulated by fingers and would work quite well. It did stick to tools quite a bit and I found that I had to keep baby wipes handy to to clean my tools down quite a lot.

The images shown here are at the end of day two and I have probably about 10 hours of work.

Tuesday, April 17, 2012

Making a silcone mold and wax pour

Another lesson learned: two right angles are difficult and time-consuming to produce in bronze.

My bronze sculpture, "Ascension"  is the woman that is rising from the base, supported by the cloth that is draping off of her hips. While I love the waterfall effect of the drapery, in reality, it causes a lot of headaches for the wax chasers, metal chasers and base makers. It also makes production more difficult, time-consuming and costly.

Additionally, the foundry mold-maker misunderstood my instructions and added wax to the back of the fabric in the mold-making process that required hours for me to remove and chase.

So, since I learned that the the two right angles are a problem and the current cloth in wax required so much time (every single time one is made!) I decided it would be best to sculpt a new section to the drapery to replace the one that they were currently using. I took the existing wax, removed the mistake in the back and designed new draping to the bottom that just clears the base. This will limit the sculpt to only one right angle (thus making production much smoother) and will also reduce the chasing done by more than 3/4 of the current time spent on this one part of the sculpture.

Once I perfected the wax fabric, I made a pour mold and then did a sample wax pouring. I was pleased that it worked well on the first try, enabling me to get the new chased wax and the new mold to the foundry so the next two in the edition can begin their process into becoming bronze #2 & #3 of 33.

Tuesday, March 20, 2012

Ascension Traditional Bronze Patina

This is the traditional bronze patina on the same sculpture, Ascension. Interesting how the patina can change the look of a sculpture. They are both beautiful in different ways.

In other happy news, I'm happy to say that I was again selected to show my work at the Loveland Sculpture Invitational 2012 - so time to get back in the studio, finish those two waxes and get back to sculpting!


Monday, March 19, 2012

Bronze Ascension with stone-like patina


Ascension is finally finished. This bronze is number 1/33 and has a neutral stone-like patina. You can see that the fabric draping from her hips begins to darken until it becomes the same value as the base granite. This is what I had envisioned: a light to dark composition emphasizing the rising of the woman. I had planned on having the drapery more earthy greens and blues, but that was before I started the bronze process and before I had learned about the limits of good patina. Rather than risk having the patina change too much over time or be garish in color, I opted for a more muted palette, which is in keeping with the very quiet nature of the piece. The base is a lovely granite called Nordic Green. Truly it is more of a soft black with hints of greens and coppery browns when the light strikes it on an angle. I also paid extra to have a revolving base, which makes it easy to turn and view all sides of her.

This first bronze has already been sold to Marie...I have an Artist's Proof for myself with a traditional patina, which I will have photos of tomorrow. Two more waxes of Ascension are nearly complete and will be taken to the foundry soon to begin their journey into bronze.


Tuesday, February 28, 2012

It's a matter of balance...

 I let this piece rest a bit as I finished up my latest book, "Bully Goat.". I'm glad that I did too. There was something about the piece that wasn't quite what I was looking for and needed the time and distance to mull it. I am trying to achieve the same sanguine feel of "Ascension" but there is a fine line between calm relaxation and stagnation of a pose. I came to the conclusion that the the pose was looking a bit too much like she was levitating instead of rising...there wasn't the balance of dynamic tension that I needed.

So I began to smush, cut, twist and turn until I got a pose that still is sanguine and relaxed, but now has some forward energy. The woman is leaning slightly forward as she ascends and the fabric that will be her support is going to trail backwards, giving a bit more movement.

I'm very glad that I decided to do this maquette (clay sketch) before going to final art, as it gave me the opportunity to practice and work out some problems, which will allow me the pleasure of pure sculpting on the final piece next week! I am going to take "State of Grace" down to my foundry and base shop tomorrow to have them verify that the balance of the sculpt will work in bronze and get some base ideas too. I'll also have the pleasure of picking up my first two finished bronze "Ascension" pieces!

Next, I'll be off to the hardware store to get a few odds and ends to finish up the armature before starting the final 18" version of "State of Grace".

Below is the newer pose with more dynamic tilt to her body and flow of fabric behind her:
Here is the original pose. While I liked how quite and relaxed and in repose she was, I was concerned that the overall feeling was more of stagnant levitation instead of active ascension. What do you think?

Sunday, February 5, 2012

Refining the clay sketch maquette "State of Grace"

 I spent a little time refining the forms and attitude for this clay sketch. It is next in the series that I'm doing of rising women. The first, "Ascension" is nearly finished in bronze and releasing very soon. This sketch in clay is a study for the next to go to bronze. The simple armature is 12" - about the same size as "Ascension". The final for this sculpt will be 18" using the smallest of the TruForm armatures.

Overall, I'm pleased with the direction that this is taking, but will change the hair and cloth a bit on the final. I'll be taking this sketch down to Art Castings to have them look her over for any casting problems before I start the final. I'll also take the sketch into the Base shop to get some ideas before I go to sculpt that may change the fabric and the overall height. Once I've had a chance to discuss this piece with my bronze team, I can begin working on the final clay to size.

This piece will be titled "State of Grace". 12" armature - but with hair and cloth she is currently 18" tall.

Thursday, January 26, 2012

Metal Chasing of "Ascension"


The bronze has been poured then the metal shell smashed off. After it was sandblasted to clean off any lingering particles, they take the sculpture in and begin to weld the pieces back together. Then an artisan known as a metal chaser then works on
burnishing out the weld seams and any some imperfections that they find. Marker indicates areas that they will do some additional work.

 I spent a lot of time at the Base Shop selecting the base (Nordic Green Granite) and how the sculpture will work with the base. We are going to go with a two tier base so that there will be room for the turntable (then the sculpture will rotate smoothly)

The sculpture is looking beautiful and I've mapped out my patina ideas - so once the sculpture has been custom fit to the base and the chasing done - it will be time to patina and affix to the base!

Tuesday, January 24, 2012

First Bronze Pouring of "Ascension"


Today was the first pouring of bronze for "Ascension"!  The shells had been built up over the hollow wax sections over a period of time. The shells were then placed into the furnace and the wax was melted out - a process referred to as "lost wax".

Next they took special buckets and collected the molten bronze and poured the liquid metal into the now-hollow ceramic shells. Once the bronze cools, they break apart the ceramic shells using hammer and pneumatic tools. After removing the hard shells, the sprues are then cut off using plasma torches.

Once that is completed, the sections of bronze are cleaned up by sand-blasting the last bits of plaster shell residue.

Finally, after the pieces are cleaned up they are ready to be welded back together.

Tomorrow I'll post photos of the sculpt being metal-chased.

Thursday, January 19, 2012

Refining clay sketch maquette

I got a little more work in on the clay sketch - refining shapes and forms a bit. This is Chavant's LeBeau Touche' HM (High Melt) plastelina oil based clay. As it's softer than my J-Mac Extra Firm, it's proving to be much easier to work quickly and the softness of the clay (when warmed under a light) makes it much more malleable. I originally started working with Chavant High Melt nearly 20 years ago when we lived in Sarasota and Placida Florida. At that time I was doing a lot of bas relief sculptures for Image Creations of Florida and found that the HM was the safest clay for me to use in my studio and then transport in the high Florida heat to my client's offices nearly 2 hours hot drive from my studio. Other clays would sometimes literally melt in my car during the commute.

So if you work in a high temperature climate I would highly recommend Chavant's HM (High Melt) clays for your use.

Tuesday, January 17, 2012

Maquette - clay sketch for next scuplture


While I have my 18" Truform armature set up and ready to go, I'm still working out the pose in my head. I decided that some sketching was in order but instead of breaking out the sketchbook, this time I decided to sketch in clay to work out some of the mechanics before I go to finish.


Anyone who know me know that I am an unlikely mix of spontaneous impatience (I want to get started NOW!) and relentless perfectionism (it must be as good as in my mind - no better, Better, BETTER!)


That can make for some frustrating work habits. So I'm killing two birds with one stone - starting work NOW and accepting that it can't be perfect because it's only the maquette (small clay sketch).


I am using an inexpensive 12" wire armature and some old Chavant LeBeauTouche HM plasteline. While this plasteline is perfectly fine, I do like Jmac quite a bit too. Since the LeBeau is softer than my extra firm Jmac, I though it was a good choice for clay sketching - it is quicker to warm up to workable consistency and softer/easier for my hands to manipulate, facilitating a faster, looser approach. Hopefully that will lend more life movement to the sketch and yet make it easier for me to stop at a less-than-finished state and then move on to my 18" final model, using the sketch as my reference.

Monday, October 17, 2011

Ascension Figurative Sculpture is at the foundry! ~Lori Kiplinger Pandy's first bronze

After some delay, my sculpture, "Ascension" has been delivered to the foundry at Art Castings of Loveland! They will be making a multi-piece mold of her. Then they will cast her in wax. Next they'll chase the wax. After that, they dip her into plaster and sand many times over a period of a week or more. Finally they'll melt the wax out of the plaster shell, then pour in the molten bronze. After the bronze cools, they'll smash off the outer shell to reveal the bronze pieces.

Finally, they'll assemble the pieces and weld her back together and chase all the seams. Last of all they'll apply the patina, giving her the final colors and attach to her stone base. Each an every bronze sculpture will require this process:  from pouring the wax to attaching the base!

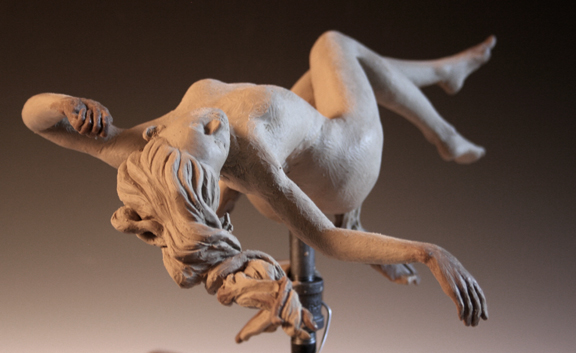
She measures approximately 10" tall (without base) by 15" long and 6" wide. She will be supported only by the fabric that drapes from her hips. The fabric will pool onto the base, flow over the edge of the base and onto the table."Ascension" will be an edition of 33 plus several Artist's Proofs. Number 1 of 33 has been pre-sold already!

If you would like to see the entire actual process of developing a bronze from mold-making to final patina, you can view the short video from Art Castings here.

 The entire casting process will take about 10-12 weeks. I have to study some patina choices but I have something very specific in mind and will post that soon.

I must say that I am very excited to finally have her at the foundry. Being somewhat OCD about my work, I have a hard time letting go ;-)

But I must say, I loved, loved, loved, sculpting her! Even when a mishap came along to destroy
her hand or her face, I had just as much fun sculpting her again as I did the first time. In fact, the sculpting itself was very rewarding and relaxing. The hardest part of this sculpture was learning about armatures and the ways of working with this particular medium, Jmac Classic Clay.

I learned so much from working on this sculpture and am looking forward to using that hard-won experience on the next piece.

Once the sculpture is final, I will release the retail price along with the new photos.

Thursday, March 3, 2011

Mad dash to enter the Loveland Sculpture Invitational Show

It's been a busy month! After finishing my latest children's book, Nana's Silly Goats,  and signing a contract for another one with Operation Outreach USA, I worked long hours getting my submission ready for the 2011 Loveland Sculpture Invitational. I had to purchase some lights and backgrounds and practice my photography, as I couldn't afford to go with a professional photographer at this time.

Having no other place, I set up a temporary photo studio in the garage (thank goodness we insulated!) and learned to control my white balance and lighting better. It took two trips to Boulder (pretty drive, but still a 2+ hour round trip) to Mike's Camera to get the softbox and paper.

Next I scoured off the patinas that I did in class that I felt were too dark and heavy. Since I didn't like the existing patina, I figured it wouldn't ruin it to try and take it off and do another. So I spend days doing glazes on the ceramic until I found what I liked. This seated woman, "Sitting Pretty" is definitely better with the new patina as the older one was very heavy and nearly black, obliterating detail.

The sleeping woman came out rather well - the patina is soft and warm and compliments the sleeping figure well.

Ascension is still a work in progress, but is coming along.

Next is Sweetness, my plus-sized figure and last is Contemplate, a seated nude.

Hopefully I made the deadline - it was midnight tonight, but I did have some trouble using Zapplication and by the time Paypal processed it was 12:01.

Well - I did the best I could and I'm glad that I tried. Whether I made it into the show or not
learned a lot and it's all part of the journey.


Now for a well-earned glass of wine!


Friday, January 7, 2011

"Ascension" Oil clay figure sculpture work in progress


I'm very excited about my first oil-based clay figure sculpture. It's the first time I've used a wire armature. This is loosely based on a life pose from the Art Students League class that I took under Rik Sargent recently. I'm still getting used to the Classic Clay - rather sticky feeling in comparison to water-based clay.

You'll notice that some of the hands, feet, hair and cloth are a darker color. Rik showed me that you can mix casting wax with the clay to make a much harder clay mix that can hold smaller detail better than the oil clay alone. So even though I had fully sculpted her hands and feet, I cut them off, re-sculpted them using the wax/clay mix and reattached them.

Because I wasn't really basing the sculpt on any particular pose from the model, it changed as I aggressively manipulated the figure for more drama - thereby exposing some of the armature wire in the process. In addition, the pipe supporting her is also in the way. I will be making a mold and casting this piece in wax. Once I have the wax, I'll be able to sculpt away the imperfections caused by the wires and post.

Finally, I may make a mold of the wax and take it to the foundry for casting my first bronze. When she's complete, the flowing cloth will be her only support - she'll appear suspended in mid-air, caught in the moment of ascension.

Rik has generously offered to help me through the steps working with moldmakers and the foundry. If you ever have the opportunity to take a class with Rik DO IT! He's a very giving and inspiring sculptor and teacher!

Thursday, November 11, 2010

Contempative Woman - a ceramic nude sculpture work in progress

I started this sculpt when taking Philippe Faurat's figure study class at the Sculpture Depot two months ago. If you ever have the opportunity to take Philippe's class then DO IT! He's an amazing sculptor and a hoot and a half too ;-)
So this technique is new to me - the sculpture is almost entirely solid. According to Phillipe - she'll fire just fine if REALLY DRY first. (Fingers Crossed) As I live in semi-arid Colorado, dry isn't really a problem here. I'd say that I had about 10 hours of model time on this piece and put in another 4 to 5 hours sculpting at home and she's about 80% done. I’m juggling illustrating a children's book at the moment, so I've kind of shelved her for a while and just misted her with water a few times.

This is a low-grog ceramic clay and it is 16" high. I believe that it will fire to a white finish and plan on doing a marble/stone look for the patina if she survives the firing. I'm looking forward to taking a few more hours to refine and finish before the long, slow drying process.
On another note – I may have a kiln! I’ve been looking on Craigslist for a year now and if all goes well, I should have it by next weekend….then I’ll be able to fire my pieces and be more productive – very exciting!

Next up, I’ll be showing you my first oil-based clay figure. It’s one I’m working on from a class from the Denver Art Students League with Rik Sargent as the instructor. Another terrific teacher – you really need to look at Rik’s work – his monumental bronzes are amazing and he’s been such an informative teacher – I’ll do my next post on his class and my new piece….


Friday, October 1, 2010

Sleeping Nude

Busy, busy, busy. Unfortunately no time to post lately. I had a wonderful time at Sculpture Depot in Loveland last month. They sponsored a workshop with Philippe Faraut (my second). The first was a portrait workshop years ago, so I was thrilled to get to do a workshop on the full figure with Phillipe.  It was a good class - a nice, diverse group of people to share the journey. We spent two days doing studies that I enjoyed, then destroyed ;-) Then a day doing one larger piece. I'm still working on that one at home from memory.

I'm getting better at letting go, smashing up studies or sculpture that isn't working. Don't get me wrong - I was quite pleased with many of the small studies, but the process and experience was what I was after, not the physical product. So I only kept one of the smaller studies. We had about 4-5 hours with the model in this pose, then I did the rest at home. This is water based clay with low grog and the piece is about 9 inches long. This one I sculpted solid and didn't hollow. I'll allow to dry very, very slowing and try firing it my my ancient, questionable little kiln. If it doesn't make it, well, it was fun to sculpt anyway ;-0