Showing posts with label figure. Show all posts

Monday, May 21, 2012

Shipping disaster - or how to destroy a sculpture...

 How utterly disappointing. I was looking forward to finishing "Waiting on the #9" this week following the National Sculpture Society's Celebration Weekend in Loveland. I had this sculpture professionally packed and shipped from a shipper near Brookgreen Gardens.

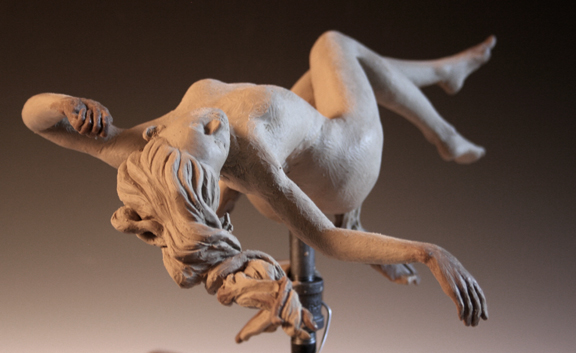
When I got the box, all looked great - from the outside. Not a dent and it indeed was carried to my door right side up. When I opened it, however, this is the what I found. The sculpt had come completely off the vertical armature post. The screw was stripped and the sculpture was lying face down, ripped off at the ankles.

Obviously it had rolled around hard because the armature wire from the ankles down was torqued and bent. The whole thing is badly smashed.

The sculpting base had been screwed to the plywood under the inside box (it was double boxed) so the base was secure. I can see that the sculpture stand base is compromised, the vertical support pipe is loose and the bolt tightening it will no longer hold it tight because the board where the pipe fits has been weakened, so the pipe will no longer be sturdy on this armature. You can see the stripped pipe treads and how it has metal burs coming off on my hands.

This is sickening and I can't deal with it today because I'm too disappointed, not to mention behind my projected schedule to finish and get to the foundry. Instead, I'll head to the hardware store to collect items for a new armature and assess if anything can be salvaged tomorrow when I'm not as angry over this $150 shipping nightmare....

Tuesday, May 15, 2012

Continuing the rough in of standing figure

This is a continuation of blocking in the standing figure on day 3. I'm using my ipad to take quick photos as I go so the quality of photo isn't very good, especially the lighting.
After I took these photos, I raised up her support bar on the armature stand so I could add some additional clay under her feet. I felt it was too thin, plus I had decided that I wanted to have her wearing flip flops and a dress and needed room to put her shoes. Also the slightly larger base will give the piece more support - both in bronze and also when I ship the soft clay across the country back home to continue working.

I find the darker red clays are a bit more difficult to see the form over the lighter tan clays. Not everyone will agree with me on that, but it's a personal preference.
I made many changes as I worked quickly and didn't have the opportunity to photo those changes. I cut her head off twice to raise and lengthen her neck. It was correct by the proportions of the model, but didn't feel quite right on my piece, for the attitude that I was going to convey. So those changes were quite satisfying to make. When sculpting for yourself, you're quite free to change proportions and faces and hair - something I do quite often. That's not the case for a true portrait, of course, where you need to represent the client accurately. However, as I'm deciding the course of this particular piece it's quite liberating to create her however pleases me. Tomorrow I will post photos of the piece as I've started to sculpt her clothes and  shoes - which I enjoyed tremendously.

Tuesday, February 21, 2012

Hot Patina on Bronze Ascension

 Nearing the end of the bronze process. The final chased bronze sculpture was attached to a temporary base and washed wshed in a mixture of Potash Sulphurated (also known as Liver of Sulphur).
Then the whole thing was heated in an oven for 20 minutes. Next the patina artist, Chad, layered titanium while and other earth colors and blazed it with a torch.
Once the metal has cooled, it will be sealed with laquer and waxed an attached to the final base made of Nordic Green Granite.I should have photos of the final bronze sculpture soon!


Tuesday, January 24, 2012

First Bronze Pouring of "Ascension"


Today was the first pouring of bronze for "Ascension"!  The shells had been built up over the hollow wax sections over a period of time. The shells were then placed into the furnace and the wax was melted out - a process referred to as "lost wax".

Next they took special buckets and collected the molten bronze and poured the liquid metal into the now-hollow ceramic shells. Once the bronze cools, they break apart the ceramic shells using hammer and pneumatic tools. After removing the hard shells, the sprues are then cut off using plasma torches.

Once that is completed, the sections of bronze are cleaned up by sand-blasting the last bits of plaster shell residue.

Finally, after the pieces are cleaned up they are ready to be welded back together.

Tomorrow I'll post photos of the sculpt being metal-chased.

Thursday, January 19, 2012

Refining clay sketch maquette

I got a little more work in on the clay sketch - refining shapes and forms a bit. This is Chavant's LeBeau Touche' HM (High Melt) plastelina oil based clay. As it's softer than my J-Mac Extra Firm, it's proving to be much easier to work quickly and the softness of the clay (when warmed under a light) makes it much more malleable. I originally started working with Chavant High Melt nearly 20 years ago when we lived in Sarasota and Placida Florida. At that time I was doing a lot of bas relief sculptures for Image Creations of Florida and found that the HM was the safest clay for me to use in my studio and then transport in the high Florida heat to my client's offices nearly 2 hours hot drive from my studio. Other clays would sometimes literally melt in my car during the commute.

So if you work in a high temperature climate I would highly recommend Chavant's HM (High Melt) clays for your use.

Tuesday, January 17, 2012

Maquette - clay sketch for next scuplture


While I have my 18" Truform armature set up and ready to go, I'm still working out the pose in my head. I decided that some sketching was in order but instead of breaking out the sketchbook, this time I decided to sketch in clay to work out some of the mechanics before I go to finish.


Anyone who know me know that I am an unlikely mix of spontaneous impatience (I want to get started NOW!) and relentless perfectionism (it must be as good as in my mind - no better, Better, BETTER!)


That can make for some frustrating work habits. So I'm killing two birds with one stone - starting work NOW and accepting that it can't be perfect because it's only the maquette (small clay sketch).


I am using an inexpensive 12" wire armature and some old Chavant LeBeauTouche HM plasteline. While this plasteline is perfectly fine, I do like Jmac quite a bit too. Since the LeBeau is softer than my extra firm Jmac, I though it was a good choice for clay sketching - it is quicker to warm up to workable consistency and softer/easier for my hands to manipulate, facilitating a faster, looser approach. Hopefully that will lend more life movement to the sketch and yet make it easier for me to stop at a less-than-finished state and then move on to my 18" final model, using the sketch as my reference.

Monday, January 16, 2012

Preparing board and Truform armature

 Time to get my new armature ready. I went to the hardware store and got my flange screws. After deciding the placement for the armature, I marked the board, pre-dilled the four holes, then screwed the metal flange in place.

Next I attached the metal armature rod from my 18"Truform armature. I bought this a while back, but have been busy working on other projects and haven't had the chance to try this.  The head is removable but the rest of the armature is not. In the larger sizes, you can take off the arms and legs, allowing you easier access to work on the sculpt - a real plus in certain poses.

I do know it was very tricky trying to get to certain areas with my "Ascension" so it would be beneficial to be able to take the arms and legs off of this armature. Since that isn't an option on this size of armature, I've been experimenting with creating my own system for making the extremities removable. So far 3 of my four designs failed, but the 4th is showing some promise, so I will do further experiments before starting this sculpt.

This will be a new experience for me, as I made my own armature using multiple aluminum wire for "Ascension".

Also, as I had some difficulties with the hands getting bumped, I'm building some wire armature hands to put on this piece, which may be very helpful or just a big pain in the butt - time will tell.


Friday, December 23, 2011

Wax Chasing & Lessons learned


I worked on the first two wax castings of "Ascension". The folks at Art Castings were very helpful and Mac did some good work on the chasing. However, he was working blind, as he got her in pieces and had no real idea how she went together. Can't imagine doing that! So I learned that it's a good idea to provide a series of photos for them to work from.

Another issue was that there was some confusion over how the bronze was to be mounted onto the base. Since they didn't have a photo, they thought it was one way and realized that there wouldn't be enough metal to support the floating woman.  In reality, there was, mounted the way I had planned. So I had to go back and carve out all the wax that they had added.

Never worked with wax before so after a few hours at the foundry, I decided to pack her up and take back to my studio, since it was taking longer than I thought. You can see my desk with the various tools. The hot tool that is plugged in on my desk proved much too hot to use on the sculpt much. It vaporized the wax and melted much too aggressively to be much use to me. So I kept it on and placed my metal tools on the hot tool to heat the metal carving tools. That worked much better, overall.

It still took many hours, but that is mainly due to my inexperience and I'm sure it will go much faster next time. I may even chase the entire wax next time to gain even more understanding of the practice and to familiarize myself with what casts easily or harder to incorporate into my next sculpt. After finishing her up I took her back to Art Castings. Luckily for me, Jeanne too a look at the photoshopped image I had made explaining the mounting process - she didn't think it would work - that the stone would chip!

So I buzzed over to the Base Shop and spoke with Brian. Thanks to Brian and Jeanne, we were able to come up with a solution that will enable me to mount the sculpture as I had planned, with a bit of extra effort, and another lesson learned!


Friday, December 16, 2011

Finishing ceramic clay portrait of Harriet Tubman

 Harriet was very inspiring to sculpt. I took longer than I needed because I tried out different sculpting techniques from very impressionistic to fairly tight. I have to say that I really liked the looseness of the impressionistic version - so full of energy. However, as she neared completion the strength of her personality and her face competed with the strong strokes of the very loose version.

So I continued to refine until I felt that I struck a balance of free strokes and polish. The clay is a very heavy, firm, groggy clay called Chestnut that I got at Mile Hi Ceramics. It's an interesting clay to work with but the heavy grog can be a bit sandy to work with. I find that the grog (sandy, pebbly particles that add body and strength to a clay while reducing shrinkage rate when firing) comes to the surface when using sponging or brushing with water on the surface. However, if you push on the surface using wood or metal tools or pallets, the grog is pushed deeper into the clay and the surface is smooth - or at least smoother. I found this to be an interesting combination as I burnished a few areas where the skin would be most taught, giving a tighter, more light-reflective property to the clay and leaving the more textured, groggy clay for other areas. Very tacticile

This portrait bust of Harriet Tubman was very satisfying to sculpt. I plan on doing a 3/4 figure of her soon and the bust was a way of getting familiar with her face and features before expanding into more of the figure later.

She'll need to dry for a while before firing, so that won't take place until sometime in January.


Monday, November 7, 2011

Harriet Tubman Ceramic Portrait Bust Demo

 Here is an update on Harriet's progress. I let her rest over the weekend after having hollowed her out. She was a bit over-dry when I checked this morning, so I've soaked some cloth to drape over the driest parts and misted well before beginning work again.

I can see I've got to work on the symmetry a bit more, but she is making progress. I intend for the surface to retain a lot of looseness and energy, so the challenge will be to bring it to a level of completion that pleases me and stopping before I overwork her. Estimated time to date: 5 hours.

Monday, October 31, 2011

Clay sculpture portrait demonstration Harrient Tubman


Making progress on Harriett Tubman bust study. This is at about the 3.5 hour mark. The clay is wet and heavy so I have sticks pushed into the heavy areas to help support while firming up. Once I'm fairly satisfied with the forms, I'll cut her up and carve out the interior to hollow out then reassemble to work on her some more.


Sunday, June 26, 2011

Figure Sculpting Demo - young dancer in ceramic clay #3

 Here is the progress - her arms have been attached. The clay is still quite wet. I would be further along, but as it's a studio tour, I stop working to meet with visitors to explain my work and methods ; -).

There is still 3 more hours of the tour, so I will continue to work and post photos the rest of the day - come on out to visit until 5pm today~

Figure Sculpting Demo - young dancer in ceramic clay #2


Here is the progress - I've continued to move the sticks around at the form takes shape. The clay continues to sag and slump and I am continually bringing it back up to it's original height.

Next I will begin forming the arms and putting into place.

Stop by today to see the progress in person - I'll be sculpting until 5pm today as part of the Fort Collins Studio Tour!

900 Marble Drive.

Monday, April 4, 2011

New terracotta clay bust in progress

 I have been swamped with designing the layout and illustrations for my newest book for Operation Outreach USA. Love illustrating for them, but wishing there were more hours in the day. Also got word that my other book, Nana's Silly Goats has been printed and is currently being shipped to the states. Nancy said it's gorgeous and I must say the color proofs we reviewed earlier looked great so I'm really looking forward to seeing them. I'll be posting some of the art on my website soon.

Currently I'm working on a new bust of an African American woman. This is sculpted in Chestnut. It's clay left over from my class with Andi Mascarenas and so was a bit stiff to work with as it's rather old. But I couldn't stand to waste the clay, so while it was quite hard, I soaked it well and let it marinate for a couple of days, then wedged it a bit to work the hard bits into the mushy bits.

This was actually started nearly 8 weeks ago and shelved when deadlines hit. When I got back to her, it had gone well past the leather hard stage, so was a challenge to get working again. I had a heck of a time cutting her in half to hollow out! Once I finally got her hollowed and put back together, I worked in her shoulders and started her scarf. These are some early photos and I should have newer ones up in the next day or two showing the progress.

Still not sure what I think of Chestnut. It's a rather stiff and very coarse clay. You can really see the grit and grog. Sometimes I like the earthiness of if it, but other times I find it distracting. I'll probably compare it with some other clays after firing. The plus-sized woman that I sculpted earlier using his clay fired nicely. It comes out a very, very dark brown color, which is interesting.

Friday, January 7, 2011

"Ascension" Oil clay figure sculpture work in progress


I'm very excited about my first oil-based clay figure sculpture. It's the first time I've used a wire armature. This is loosely based on a life pose from the Art Students League class that I took under Rik Sargent recently. I'm still getting used to the Classic Clay - rather sticky feeling in comparison to water-based clay.

You'll notice that some of the hands, feet, hair and cloth are a darker color. Rik showed me that you can mix casting wax with the clay to make a much harder clay mix that can hold smaller detail better than the oil clay alone. So even though I had fully sculpted her hands and feet, I cut them off, re-sculpted them using the wax/clay mix and reattached them.

Because I wasn't really basing the sculpt on any particular pose from the model, it changed as I aggressively manipulated the figure for more drama - thereby exposing some of the armature wire in the process. In addition, the pipe supporting her is also in the way. I will be making a mold and casting this piece in wax. Once I have the wax, I'll be able to sculpt away the imperfections caused by the wires and post.

Finally, I may make a mold of the wax and take it to the foundry for casting my first bronze. When she's complete, the flowing cloth will be her only support - she'll appear suspended in mid-air, caught in the moment of ascension.

Rik has generously offered to help me through the steps working with moldmakers and the foundry. If you ever have the opportunity to take a class with Rik DO IT! He's a very giving and inspiring sculptor and teacher!

Thursday, November 11, 2010

Contempative Woman - a ceramic nude sculpture work in progress

I started this sculpt when taking Philippe Faurat's figure study class at the Sculpture Depot two months ago. If you ever have the opportunity to take Philippe's class then DO IT! He's an amazing sculptor and a hoot and a half too ;-)
So this technique is new to me - the sculpture is almost entirely solid. According to Phillipe - she'll fire just fine if REALLY DRY first. (Fingers Crossed) As I live in semi-arid Colorado, dry isn't really a problem here. I'd say that I had about 10 hours of model time on this piece and put in another 4 to 5 hours sculpting at home and she's about 80% done. I’m juggling illustrating a children's book at the moment, so I've kind of shelved her for a while and just misted her with water a few times.

This is a low-grog ceramic clay and it is 16" high. I believe that it will fire to a white finish and plan on doing a marble/stone look for the patina if she survives the firing. I'm looking forward to taking a few more hours to refine and finish before the long, slow drying process.
On another note – I may have a kiln! I’ve been looking on Craigslist for a year now and if all goes well, I should have it by next weekend….then I’ll be able to fire my pieces and be more productive – very exciting!

Next up, I’ll be showing you my first oil-based clay figure. It’s one I’m working on from a class from the Denver Art Students League with Rik Sargent as the instructor. Another terrific teacher – you really need to look at Rik’s work – his monumental bronzes are amazing and he’s been such an informative teacher – I’ll do my next post on his class and my new piece….


Friday, October 1, 2010

Sleeping Nude

Busy, busy, busy. Unfortunately no time to post lately. I had a wonderful time at Sculpture Depot in Loveland last month. They sponsored a workshop with Philippe Faraut (my second). The first was a portrait workshop years ago, so I was thrilled to get to do a workshop on the full figure with Phillipe.  It was a good class - a nice, diverse group of people to share the journey. We spent two days doing studies that I enjoyed, then destroyed ;-) Then a day doing one larger piece. I'm still working on that one at home from memory.

I'm getting better at letting go, smashing up studies or sculpture that isn't working. Don't get me wrong - I was quite pleased with many of the small studies, but the process and experience was what I was after, not the physical product. So I only kept one of the smaller studies. We had about 4-5 hours with the model in this pose, then I did the rest at home. This is water based clay with low grog and the piece is about 9 inches long. This one I sculpted solid and didn't hollow. I'll allow to dry very, very slowing and try firing it my my ancient, questionable little kiln. If it doesn't make it, well, it was fun to sculpt anyway ;-0

Monday, July 12, 2010

Forton Metal Patina

Whew....been a long time since my last post. We've been renovating some buildings and our house so time has been detoured.

Due to snow, I was only able to make a couple of the patina classes with Andi at the Denver Art Students League. The photos won't be very good, as I don't have a place to set up for photos at the moment. Hopefully I'll be able to get some better ones, with bases, up soon.

This sculpture had a base coat of Forton and bronze/brass metals. Then I used a mixture of several different oxides and patinas from the class. After the metal had oxidized, I buffed with a bit of steel wool to bring back the metal. It came out a bit darker than I had anticipated. I do think I like it overall.