Showing posts with label patina. Show all posts

Thursday, August 11, 2011

Patinas and bases


I didn't have enough time to set up and properly photograph the sculptures on their bases with the patinas prior to taking them to the show. But I did a rough shoot within 30 minutes, so while not great photos, at least it's something. Didn't get my white balance quite right but I will try to photo them later at my leisure...


Thursday, March 3, 2011

Mad dash to enter the Loveland Sculpture Invitational Show

It's been a busy month! After finishing my latest children's book, Nana's Silly Goats,  and signing a contract for another one with Operation Outreach USA, I worked long hours getting my submission ready for the 2011 Loveland Sculpture Invitational. I had to purchase some lights and backgrounds and practice my photography, as I couldn't afford to go with a professional photographer at this time.

Having no other place, I set up a temporary photo studio in the garage (thank goodness we insulated!) and learned to control my white balance and lighting better. It took two trips to Boulder (pretty drive, but still a 2+ hour round trip) to Mike's Camera to get the softbox and paper.

Next I scoured off the patinas that I did in class that I felt were too dark and heavy. Since I didn't like the existing patina, I figured it wouldn't ruin it to try and take it off and do another. So I spend days doing glazes on the ceramic until I found what I liked. This seated woman, "Sitting Pretty" is definitely better with the new patina as the older one was very heavy and nearly black, obliterating detail.

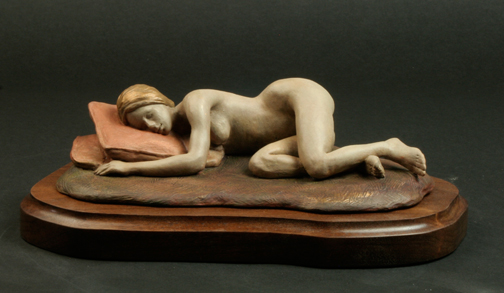
The sleeping woman came out rather well - the patina is soft and warm and compliments the sleeping figure well.

Ascension is still a work in progress, but is coming along.

Next is Sweetness, my plus-sized figure and last is Contemplate, a seated nude.

Hopefully I made the deadline - it was midnight tonight, but I did have some trouble using Zapplication and by the time Paypal processed it was 12:01.

Well - I did the best I could and I'm glad that I tried. Whether I made it into the show or not
learned a lot and it's all part of the journey.


Now for a well-earned glass of wine!


Thursday, February 24, 2011

Miniature Fox Sculpture with New Patina

I wasn't satisfied with the first casting and patina of my miniature fox sculpture, so try, try again. This one came out much more to my liking and I earned a good lesson: solid colors show texture and form much better than variegated colors. Especially in such small scale (about 3"). I have a base that I'm preparing so when it's dry we'll see how it looks on a solid wood base.

My next endeavor will be to cast this fox in wax and chase it. I have an appointment with Art Casting Foundry in Loveland, where I'll be having this little guy bronzed!

I'm quite excited about that - I sculpted him with mold-making and bronzing in mind as I want to learn both processes.

Since this patina came out much better, it gave me the urge to work on some of my other sculptures. There were two in particular that I didn't care for how the original patina came out. Since I wasn't happy with the over all look, I decided that I could risk ruining them further by removing the patina and trying a different. It was a good choice - and I will post new photos of them soon.

Lastly, I've been struggling with my photography. On a shoe-string budget, I've been trying to outfit my photo area and have been making loads of test photos. Thank goodness for digital! Back in the day you could photo for a show, send the film off and not find out till a week later that they were awful! But now - Bam! upload the photos and see how bad they are instantly! ;-) Actually, I made real progress this week in getting white balance and lighting to agree - so new photos will be up soon!

Saturday, January 15, 2011

Cast sculpture miniature fox

This is the final cast piece from the mold I made of my miniature fox. You can see the original oil-based clay sculpt on my December blog. The instructions and process of how I made the mold are in the previous post.

This was cast using Smooth-On's Smooth-Cast 300 liquid plastic.

This is an easy product that is mixes compounds A+B in equal amounts. The plastic cures in a matter of minutes to a very white plastic. It demolded from the silicone very easily.

The down side is that, well, it's PLASTIC. Not my favorite substance. But this is a learning process . I painted the plastic casting using acrylics to mimic dark stone and the results are fine. I should have done a little more clean-up to the lines where the mold joins together, but for a first try at casting, I thought it came out well.

I could also pour melted wax into this mold, clean up the wax and take it to bronze at some point. We'll see ;--)

Friday, September 3, 2010

Patinas and Pedestals

Finally - getting a few sculptures finished...

I had fired a few of the ceramic sculptures - then then them sit around as I dreaded attempting the patinas. I did a few using special Forton mixes with a chemical reaction. Since I only did a few, it's a little unfair to make a judgment. My first impression, however, is that the Forton mix is a bit thick and obliterates the sculptural surface a bit for my tastes. The outcome was very difficult to predict and I wasn't in love with the overall look of some of them.

I painted the Scarlet Robe in oils, which was messing and time consuming but the overall effect was nice. For the "Claire" bust, I opted to try many glazes of acrylic. Some of the layers, I spritzed with alcohol to break up the surface and create pattern - that worked rather well. Some of the layers I lightly sponged for additional texture.

The effect is pleasing and rather stone-like. With practice, I'd think that this would work really well on a lot of sculptures. Still working on my photography skills and lighting. As I don't have a dedicated space or the proper lights, it's still something that I need improving upon. The base was made by Imported Onyx in Loveland.