Showing posts with label water based clay. Show all posts

Thursday, March 7, 2013

Sculpting emotion of Loss continued

 I've been inundated with publishing deadlines, so haven't had much time for sculpting. I've finished with blocking in the forms and establishing the figure. Before I go too much further, I need to determine the flow of the hair and dress.

When I work on a sculpt, it is very important to me that all the parts work in agreement. In my tiny maquette of this, the dress was fairly still and the hair was blowing away from the face, however as I work on this I'm leaning more towards the hair and dress blowing forward and whipping around and past her face. This will cast some shadows and obscure her face a bit however I think the effect will be one of loneliness and a feeling of being enveloped and overwhelmed - which, to me, is how loss feels.

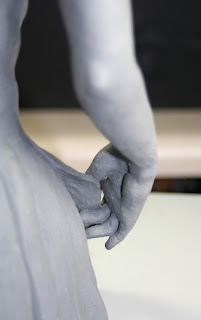
So - I will refine her forms and her face before putting on the dress and hair, but this gives me a better idea of things. Next I will cut off the hair, dress and arms. The hands are next on the agenda and will be difficult to do. Once I've finished the arms and hands and re-attached, it will be time to sculpt the hair, dress and sandals - the zen icing on the cake in terms of working and I'm really looking forward to that part. I'm sure I'll be playing a lot of quiet cello music on my Pandora when getting to those nuances - the mood must all match...

CT3 Water-based clay over a wire armature to be made into bronze.

Thursday, January 24, 2013

Building up the form of the figure

I'm continuing to build up the forms in this water-based clay sculpture that is based off of my tiny maquette, "Loss". I cut off the arms and removed the wire armature as they were drying out too quickly - that then started to place the arm shapes back into place with toothpicks to bolster them until the clay firms up a bit. 
The clay is old and isn't the best to work with. Seems like I buy clay - then another deadline hits and I store it too long - and it loosed the placsticity a bit. Nevertheless, I will continue to refine the sculpture and add the hands next. On a different note, I've been accepted to the Loveland Sculpture Invitational again this year and will be working hard to have new works for the show in August!


Friday, August 3, 2012

Hollowing the clay bust

Good things come to those that wait. While I know this, sometimes I still rush things. Wanting to get the heavy, wet clay out of the portrait and to speed drying in hopes of firing this bust for the Loveland Sculpture Invitational, I proceeded to hollow out the sculpt before it was firm and dry enough. Result? The clay couldn't keep its shape and distorted, warped and cracked/broke in places.

I knew I could fix things, but I certainly made it more difficult for myself and conversely it will take longer to finish than if I had waited another day or two for drying. Note to self- learn patience.

First I took the wire that I had taped to support pole prior to adding clay and pulled it up and through the sculpture behind the ears. Next I pried the back of the head off and laid it on a pillow wrapped in plastic. The I hollowed out both sides of the head, preserving the interior clay of later use.
I did some damage to the face, which is easy to do when the clay is too soft. I also found that there was heavy distortion when I reassembled the clay that required additional work to correct.

The sculpt has been repaired and nearing completion - will post new photos soon.

Thursday, July 26, 2012

Portrait sculpting demo - Daughter

I started a life-sized portrait bust of my daughter this week. Below you will see the progression of where I started and up to this point.

First, I began by by crumpling some newspaper into a ball shape and taping it over a post. Next I added a generous amount of CT3 waterbased clay to form a general starting head shape. Then I made some lines to dived the head into proportion.

After that I began to carve out the eye sockets and refine the head shape and then began blocking the forms of the features.

Once I got that far, I added shapes and continued to refine the shapes. Up until this point I wasn't too concerned with getting a likeness - it was all about forms, shapes and proportions.


Now that I've gotten this far, I will let the clay rest a bit, allowing it to firm up. Then I will go back and begin to seriously define the forms, correct any proportion errors that I find and begin honing the likeness.  This portrait is just of 1/2 completed and has used nearly 1 full bag (25lbs) of clay. I will probably need another 1/3 to 1/2 bag of clay to complete the bust.

Friday, December 16, 2011

Finishing ceramic clay portrait of Harriet Tubman

 Harriet was very inspiring to sculpt. I took longer than I needed because I tried out different sculpting techniques from very impressionistic to fairly tight. I have to say that I really liked the looseness of the impressionistic version - so full of energy. However, as she neared completion the strength of her personality and her face competed with the strong strokes of the very loose version.

So I continued to refine until I felt that I struck a balance of free strokes and polish. The clay is a very heavy, firm, groggy clay called Chestnut that I got at Mile Hi Ceramics. It's an interesting clay to work with but the heavy grog can be a bit sandy to work with. I find that the grog (sandy, pebbly particles that add body and strength to a clay while reducing shrinkage rate when firing) comes to the surface when using sponging or brushing with water on the surface. However, if you push on the surface using wood or metal tools or pallets, the grog is pushed deeper into the clay and the surface is smooth - or at least smoother. I found this to be an interesting combination as I burnished a few areas where the skin would be most taught, giving a tighter, more light-reflective property to the clay and leaving the more textured, groggy clay for other areas. Very tacticile

This portrait bust of Harriet Tubman was very satisfying to sculpt. I plan on doing a 3/4 figure of her soon and the bust was a way of getting familiar with her face and features before expanding into more of the figure later.

She'll need to dry for a while before firing, so that won't take place until sometime in January.


Monday, November 7, 2011

Harriet Tubman Ceramic Portrait Bust Demo

 Here is an update on Harriet's progress. I let her rest over the weekend after having hollowed her out. She was a bit over-dry when I checked this morning, so I've soaked some cloth to drape over the driest parts and misted well before beginning work again.

I can see I've got to work on the symmetry a bit more, but she is making progress. I intend for the surface to retain a lot of looseness and energy, so the challenge will be to bring it to a level of completion that pleases me and stopping before I overwork her. Estimated time to date: 5 hours.

Monday, October 31, 2011

Clay sculpture portrait demonstration Harrient Tubman


Making progress on Harriett Tubman bust study. This is at about the 3.5 hour mark. The clay is wet and heavy so I have sticks pushed into the heavy areas to help support while firming up. Once I'm fairly satisfied with the forms, I'll cut her up and carve out the interior to hollow out then reassemble to work on her some more.


Thursday, August 11, 2011

Patinas and bases


I didn't have enough time to set up and properly photograph the sculptures on their bases with the patinas prior to taking them to the show. But I did a rough shoot within 30 minutes, so while not great photos, at least it's something. Didn't get my white balance quite right but I will try to photo them later at my leisure...


Wednesday, August 10, 2011

Jet lag and sculptures are not a good combination...

 Bummer.....I'm seriously exhausted, having just returned from Europe and having hubby and daughter sick. I picked up my little gymnast to pack her up for the auction at the Loveland Sculpture Invitational this weekend and dropped her.

While ceramic sculptures can be quite sturdy, this was a wicked drop. I wouldn't mind so much, but I was counting on donating her for the auction and I had just put had the sculpt mounted to this nice stone base. Well, I might be able to salvage the base for future use.

At least I didn't smash any others yet ;-)

I got the rest of them down to the show and will finish the final set-up tomorrow. Then I can post some photos of the booth at the show later.


Thursday, July 14, 2011

Small scale full figure gymanst in water based ceramic clay

 In order to help the clay firm up and dry out a bit - plus to make it easier for the sculpt to hold its own weight, I cut her up to hollow out more. Although I did use a small bit of newspaper to bulk out her core, I find that in sculpting and moving the position around, there areas can build up thick in some areas. Surprisingly, this one was pretty symmetrical.


I removed some more of the clay from the core and the pelvis region. Once the clay firmed up
more, I was able to reattach her and continue sculpting.

Today she was strong enough to remove from the prongs that had been supporting the weight and stand on her own. I am working on finalizing her now.

Friday, July 8, 2011

Figure Sculpting Demo - young dancer in ceramic clay #7

 Making progress on the sculpt and generally pleased with her. There are some areas that need a bit more refining. The lighting is rather harsh because I just grabbed some quick pix in the studio. .

When she's fully completed I will set up the photo lights and get better photos,

I really enjoyed sculpting her and have titled this piece:

"Her  first dress rehearsal"

This was my first sculpture of a child and I have to agree with other people - kids are challenging. I did not work from a model which can add to the challenge of a piece as I try to imagine limbs in the round. The thing with children is their softness. It makes it hard to find the forms sometimes.

 This was so enjoyable that I'm certain that I'll be doing more dancers and hopefully gymnasts too.


Tuesday, July 5, 2011

 I have hollowed out the second arm and attached it back onto her body. Then I fleshed her out a bit more and started to define her ears.

She needs to rest a bit and firm up more. Next I'll block in the hair mass and dress before heading back to start any refining.

It was quite fun to chop off her arms and move them around. I probably took them off and on about 5 times until I had both working in the direction that I was looking for. Really looking forward to the rest.

One thing I will say about paper clay is that it re-wets readily - sometimes a bit too easily and can become water-logged...but with a little time and the proper amount of circulation, you can get the firmness of the clay back to a workable consistency.


Monday, July 4, 2011

Arm placement and hand position make a difference

 I've re-attached one of the hollowed out arms. The hand is roughed into place. The new placement of the arm is more graceful and in tune with the attitude of the sculpt.

The whole body must be in agreement, or the figure will simply look wrong or awkward - so I often revise as I'm working and will change the placement of the body in order to better tell the story, emotion or intent.


Friday, July 1, 2011

What to do when you drop your head?

Start over, of course! Yep, after I reattached her head, I bumped the sculpture stand and tipped the figure precariously. Consequently her head dropped to the floor with a big plop! Naturally it did a real face-plant so there was no real salvaging her. Quite gruesome, actually ;-)

Oh well, I enjoyed sculpting her and felt she was a bit stilted in expression anyway.

So I sat down today and created a new head. I also worked on her arms by cutting them off and hollowing them out. Then I started to rough in her hands. I've decided to change the position of the arms a bit, making her a bit more expressive, too. Have I mentioned how much I love the second chances you get with clay?

Happily, the new head is in place, the body has firmed up better to support the weight and I have one arm and hand attached again. The battery on my camera needs charging so I don't have enough juice to get more photos in today....I'll photo and post the progress soon....in the mean time, I'm happy with the progress of the head and face and feel that the second sculpt is better than the first.

I'm planning on having this sculpt more 'painterly' in the finish so this will be a new challenge on to over-work the surface.

Stay tuned!

Tuesday, June 28, 2011

Figure Sculpting Demo - young dancer in ceramic clay #6

 Off with her head!

Yes, it does seem a bit brutal. However, there are several reasons to to mutilate your sculpture. In this case I wanted to hollow the head and neck more and I wanted to work on the face "off sculpt". 

By removing the head, I have easier access to the skull and the features ~ sometimes sculpting on the full form can be awkward and space limited, so by removing a piece from the overall sculpture, you can get to it easier.

I will sculpt more on the head and re-attach later. Ears and hair are sculpted later, since they would be squashed in handling anyway.


Figure Sculpting Demo - young dancer in ceramic clay #5

 No time to work on Monday and only an hour this morning...so not much change, but refined the form and the arms a bit. Later today I hope to have enough time to start her hands.

Then I may remover her head to make it easier to sculpt, be sure of my wall thickness and reattach - we'll see how far I can get....

Tuesday, May 3, 2011

Ceramic Paperclay Fox Sculpture

You may remember that I sculpted a small fox in oil-based clay. I'm still working on the wax pour of it for bronze. I decided that I wanted to make a larger version of this fox and sculpt it using a water-based clay for firing. Since Mile-Hi was out of the CT3 clay that I had planned on using, I opted to try this in water-based ceramic paperclay instead. I didn't do any measuring - I just dove into sculpting. While I did use crumpled paper for filling out the body, there was some distortion and I felt that there was too little clay in some areas and too much clay in others. So I cut this into pieces, hollowed out and reassemble before I completed the sculpting.

I was pleased to find that A) it was as much fun to sculpt the fox the second time around and B) I had no trouble enlarging the sculpture while keeping the same look and feel using a different medium. So, now it's drying in preparation for firing later.


Thursday, April 21, 2011

Ceramic Sculpture turban wrapped woman

Finished sculpting "Hint of a Smile" today. This is water-based clay called Chestnut that I purchased from Mile-Hi Ceramics. It's rather groggy but that can be interesting. This one dried a little faster than I would have liked, due to my deadlines for illustrating my book - so there are a few cracks in the turban. However, that too, may end up being a desirable thing - won't know for sure until it's fired.

I will consider using some epoxy to put in the suggestion of a pupil highlight after firing also.

With the eyes hollowed out, there is additional venting for the sculpt. I'm hoping that offsets how thick the turban ended up. I did cut her in half and hollow her out but added the turban later so that part is fairly thick.
This sculpt is just under life size. I'll post again with her after firing.