Showing posts with label sculpting demo. Show all posts

Tuesday, December 8, 2015

Stan the Skeleton moves to my new studio


Art studios are messy places with more stuff than room. Tools, boxes, bags of clay, more bags of clay, kiln, molds, mold-making materials, scales, lights, photo equipment, files and photos, sinks, buckets, sponges, scrapers, wood, plumbing fixtures, hardware, tables, pedestals, works in progress....the list goes on.
So does the moving! I'm STILL in the process of getting my new studio space up and running full time. Finding the right place for everything is a challenge. Today's event was moving 150 pounds of clay and my buddy Stan.
Stan is a life-sized reproduction skeleton (I don't usually keep the real kind around ;-) that hangs around my studio so I can reference the anatomy when I'm working on figurative sculpture.
My family isn't very sad to see Stan go. They were never too keen on coming down to the basement where I was working and running into him. I really should dress him up more for holidays....perhaps this year a Santa hat.
Too bad the car windows are tinted.....could have been fun for the other commuters to see Stan in his seatbelt.

Wednesday, November 12, 2014

Sculpting the Bas Relief Demonstration Tutorial part 7


When sculpting in oil-based clay, the clay remains pretty consistant. It does get harder or softer with temperature, but it's oil content remains stable.

Working in water-based clay is quite different. The clay dries when exposed to air. Here in semi-arid Colorado it dries significantly faster than in humid Florida.

You will find that if you are holding clay in one hand an applying that clay to your sculpt with your other hand or a tool, that the clay in your hand dries very quickly - you'll see gray dust on your fingers and cracking clay on your hand - the contact of your skin to the clay is wicking the moisture from the clay. That makes it stiffer and more likely to crumble.

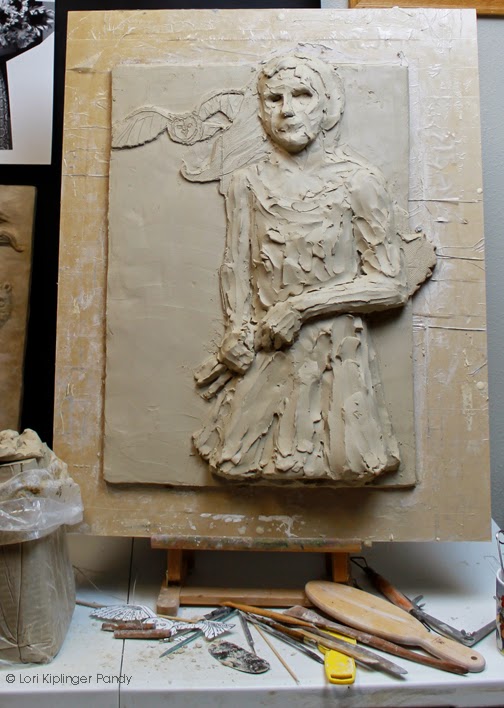
To counter this, if I'm working with smaller bits of clay, I'll take a ball of it and slap it onto an unfinished area of my sculpt - in this case a portion of the sky but it could as easily be the hair or the base of the shoulders if a bust. That way the clay is sitting on the clay and retains about the same moisture content...I simply take a pinch or use my tool to grab a swipe of the clay for application.

At this stage of the sculpt, areas are starting to dry out a bit. I am now starting to cover those sections with a damp paper towel to keep it from getting too dry when working in other areas. It will get progressively drier and firmer as I'm working, allowing for more accurate detailing.


Thursday, October 16, 2014

Sculpting the Bas Relief Tutorial part 3


Now that the clay is on the board and set upright on the easel and the image has been drawn onto the clay, it's time to start adding volume and mass to to image.

I begin by quickly blocking in the shapes - not trying to accuracy or likeness at this point - simply bring up the shapes to the highest point (in this case, the time of the nose and bottom of the skirt).

Always keep structure and anatomy in mind while you are working. Think in terms of bone and muscle. I'm not worried about surface features at all at this point - there will be time for that later.
Try not to become fixated on any part of the image. It's a trap to spend a lot of time working on face and neglecting other areas of the sculpture. Trust me, it never works out and when you finally do bring the rest of the sculpture up to the same level of finish as the face you'll find terrible problems with anatomy and distortion.

That said - I do begin with the face and keep coming back to it, as that sets the tone and emotion of the entire work.

As I said in Part 2, the drawing is going to be obliterated once you begin the actual sculpting. Clay is fluid - it moves while you work and you should never be afraid of cutting a sculpture apart and making changes as needed.

I decided that sculpt needed more tilt and attitude to the head, so I simply took a wire cutter, looped it under her chin and sliced her face off. Easy Peasy

Once her face was removed, I simply tilted the angle a bit and re-attched the face and reworked the neck. Then I set about roughing in more of the anatomy and continued to build up forms.


Thursday, July 25, 2013

Feminizing the forms - more blocking in of muscle mass

 Today I began to refine the muscle shapes and feminize the entire figure. I gave some basic contouring and features to the face and continued blocking in the muscles and forms of the body.

I must say that I am really enjoying the Clayette clay by Chavant - creamy without being too sticky.