Tuesday, December 30, 2014

Forton Bas Reliefs can take the weather changes outside...

Colorado is an area with some extreme weather and temperature changes. Last week we had temps near 70 degrees, almost record-setting for mid to late December.

Today's high, however, was 5 degrees and I write this it is currently minus 7 degrees and will be minus 11 degrees later this evening.
I snapped a quick photo of my cast bas reliefs in the snow today. I had to brush them off as they had been covered with more than 8" of snow earlier.

The wild temperature and humidity changes haven't affected them at all and they look just as lovely on the garden walls in the snow as they do with summer blooms around them.

It's nice to have outdoor sculptures that hang on garden walls, courtyards and fences to enjoy all year round.


Monday, December 22, 2014

Making a rubber mold for high bas relief tutorial

The sculpture is complete and ready for the mold. I am using Polytek's Poly 74-20 to make the mold. The sculpture is a high relief measuring 18"x 24" x 3" and took nearly all of the small 6lb kit of rubber. Since this is a fairly large and high relief I opted not to do a poured block mold. The block mold would have been easier and faster to make would would wasted a lot of mold rubber. A blanket mold would have worked too but I opted for a brush-on mold with a mother-mold shell instead.
This kit contains one container of A and two containers of B. You must stir B very well prior to mixing and directions state that use of a gram scale is recommended. You can get away with volume measurements if very precise but weight measuring is more reliable. In my case, I didn't have a gram scale so I used a postal meter scale which is good enough.
Be I measured the weight of the empty cup and deducted it from the weights of the rubber when measuring.
Here is a breakdown of steps by photos. Note that I have a few larger detail photos at the bottom:
A) Cover your work area. This is messy and does have an odor. I set things up on a covered table and assembled necessary items - the sculpt is under plastic.
B) Spray two light coats of Release Agent over the sculpt and the support board.
C) Set up supplies: scale, rubber, plastic cups, chip brushe, stirring sticks - newspaper to catch drips.
D) Stir part B well.
E) I marked two cups with A and B and resued them when measuring out the two ingredients.
F) Weighing out Part A
G) Weighing out Part B - I was sure to wipe any drips off scale.
H) Pour 1 part A and 2 parts B into larger cup
I) With clean stick mix and stir mixture well.
J) Using disposable chip brush, begin brushing light print coat onto the sculpture. I will be working in sections - mixing new batches as I go. Brush carefully and try not to make any air bubbles. This is a very thin mixture that isn't prone to bubbling, making a good print coat to catch all the details. Don't worry that it is thin and running off the high points - you will ad more later. Most important is a thin layer all over.
K) Continue mixing up more rubber and cover entire sculpt including a minimum 2" flange around the sculpture on the board.
L) Once the first coat of rubber is on, test with your gloved finger to see when it is ready for the next coat. If the rubber stick to your glove and pulls up it not ready and you would ruin the print coat if you tried to apply more rubber - wait a bit more and test again - the rubber should be tacky and leave a light imprint but should NOT pull up with your glove (detailed photos at bottom)
M) Continue to meaure out 1 Part A to 2 Parts B and mixing in a fresh larger container with a fresh stick and apply additional coats of rubber to the sculpt. The tendency will be for the rubber to slip off high points and pool in lower areas so the low areas will build up quickly. Contentrate on the high areas now.
N) As this rubber is meant more for poured bock molds, it stays quite thin. You can thicken the mixure using cabosil or short stuff. This rubber can be poured as supplied or thickened with Poly Fiber II or Fumed Silica for brushing.
N) I had short stuff on hand so this is what I used.
O) I pour small amounts of short stuff into my mixed rubber and stir well. I'm looking to make a stiffer consistency to build up the higher areas and begin to fill in any undercuts.
P) The mold rubber needs to build up to 1/4" to 3/8" to be sturdy enough for repeated use.
Q) I continue make the each batch of rubber thicker with more short stuff and use a mixing stick instead of brush to build up and fill in all undercuts.


R) I fill a plastic key molding tray with additional rubber and let it set up. With another coat of rubber, I demold the keys from the try and imbed them in fresh rubber on the flange to help key the rubber mold into the mother mold later.
S) From set up to final coat of rubber is about 6 hours with curing between coats. I've used about 12 stirring sticks, 10 disposable brushes, and 12-15 cups. I used 90% of the rubber in the kit. After letting the rubber cure overnight I come back and cut the excess off the flange.
T) Peeling back the rubber allows me to check that it is releasing well and that the print coat picked up all the detail.
The mold is complete but I must leave it intact with the clay sculpture still inside becuase I will now need to make a rigid mother mold to nestle the rubber into. The rubber is floppy and pliable - you need a firm shell to hold the shape when casting. The reason that I needed to build up those undercuts is so that the mold will pull out of the rigid shell.
Next up will be the Mother Mold tutorial.


Friday, December 12, 2014

Sculpting the bas relief demostration tutorial part 8 - finishing the work


A bout with the flu and two small portrait commissions have kept me away from this sculpt. Now I'm feeling better and the sculptures have been shipped to Australia and it's back to work.

This relief had some drying and cracking in areas that I had to cut away and put fresh clay into. Always a risk with water-based clay when you leave a project to rest for a while. So after repairing some areas I went back into refine the flowers and then soften with a bit of water. After that, I decided to add some additional hair to the right side of her face to improve the overall composition of this piece.

While that was setting up a bit, I went into the dress to add some detail - first a hint of bodice then texture and some pleating. Finally a small bow for interest.


With some additional touchups and work in the new hair area, I finally finished up the sculpture. I would prefer to mold it right away but my schedule doesn't have the time required for multiple coats of mold rubber and this is a process that simply can't be interrupted. So it looks like I will have to spray this up well, lay it flat with several layers of plastic to try to keep it from drying too much and wait for Monday to give the mold-making process my full and undivided attention.

My next tutorial will be the process of making the mold and mother-mold for this sculpture.

Wednesday, November 12, 2014

Sculpting the Bas Relief Demonstration Tutorial part 7


When sculpting in oil-based clay, the clay remains pretty consistant. It does get harder or softer with temperature, but it's oil content remains stable.

Working in water-based clay is quite different. The clay dries when exposed to air. Here in semi-arid Colorado it dries significantly faster than in humid Florida.

You will find that if you are holding clay in one hand an applying that clay to your sculpt with your other hand or a tool, that the clay in your hand dries very quickly - you'll see gray dust on your fingers and cracking clay on your hand - the contact of your skin to the clay is wicking the moisture from the clay. That makes it stiffer and more likely to crumble.

To counter this, if I'm working with smaller bits of clay, I'll take a ball of it and slap it onto an unfinished area of my sculpt - in this case a portion of the sky but it could as easily be the hair or the base of the shoulders if a bust. That way the clay is sitting on the clay and retains about the same moisture content...I simply take a pinch or use my tool to grab a swipe of the clay for application.

At this stage of the sculpt, areas are starting to dry out a bit. I am now starting to cover those sections with a damp paper towel to keep it from getting too dry when working in other areas. It will get progressively drier and firmer as I'm working, allowing for more accurate detailing.


Thursday, November 6, 2014

Sculpting the Bas Relief demonstration tutorial part 6

 My sister sewed up some sleeve protectors for me. My studio gets quite cold and I'm often wearing jackets and sweaters, which drag in the clay and get dirty. I drew up a quick idea and she sewed a sample set for me. They go over the tops of my sleeves and the elastic keep the cuffs of my clothes from getting into contact with the clay. Works great - will make the next set a tad longer.

Now that most of the relief has the forms in place and I feel confident of the anatomy of the arm, it's time to rough in the sunflowers that she'll be holding. It's important to sculpt the arm even though it is covered up because if you cheat on the anatomy, it will look off - people won't be fooled. So you don't have to bring that area to finish but the anatomy should be solid and convincing.

I begin by working the stem shapes and placing the largest forms of the sunflowers and then start to refine the shapes. The clay will need to set up a bit before I work the petals and leaves. I plan to do them in a loose manner to keep the focus on the girl.

Next I take a homemade brush made from broom twigs and crosshatch all the forms to homogenize them a bit.
 

Monday, November 3, 2014

Sculpting the Bas Relief Tutorial Part 5


The sculpting demonstration tutorial by Lori Kiplinger Pandy continues with a push and pull of the clay forms.
I am continuing to build up the highest planes and the remove clay from the receeding areas. Throughout this process I turn the sculpture from side to side and stand on a step stool to view from above or squat down to look from below.

You must constantly be aware that this is not a painting, viewed simply from straight on, it is a sculpture and will be viewed from different angles.

After a period of working, I'll wet the clay a bit and use a home-made brush to crosshatch over the entire sculpt to knock down areas and blur some edges - this helps me to see how the forms are taking shape overall and to blend


the clay a bit.
Once the clay has had a chance to rest a bit, I'll step back and review the sculpture as a whole and evaluate it's progress before I proceed to working again on the sculpt.
You'll see that I started to rough in the owl in the background - it is imperative that you keep bringing each area up to the same amout of finish as the rest - having one area of scupt leap too far ahead of other areas causes distortion and usually results in having to rework large areas of your sculpture.

I will be visiting galleries for potential partners during the next week so it will be a little while before I post the next section of this tutorial.

In anticipation of my absence, I have sprayed the clay, double wrapped it in plastic and taken the entire board off the easel to lay it flat on a table. I don't want the moisture in the clay to migrate from the top due to gravity and cause uneven drying or warping, so placing it flat should keep it stable until I can return to work.

Saturday, October 25, 2014

Review of customer servive: Polytek Mold and Casting

When it comes to materials and service, I always want to hear when someone has a good or bad experience. In this case, I give two thumbs up to Polytek for there wonderful service.

I called them up with a question on one of their materials. I had used their Poly PT Flex 20 rubber for one of my reliefs. The mold process when well, in fact I was very happy at how easy it was to mix and use and how quickly I built up the mold. Peeling back an area once dry, I peeked at the mold and it looked great - really capturing the detail and had a nice give (important with my deep undercuts.) I was pleased and went to make the mother mold shell out of Forton to make it strong and light.

The problem came when I tried to remove the forton shell from the rubber - it had bonded completely - and I do mean COMPLETELY to the rubber.
The whole thing was ruined and a lot of money lost, not to mention the time and the damage done to the original sculpture. I had to repair the sculpture before making a new mold.

It was crunch time for a big show and I was under the gun - so waited until the dust had settled before calling up Polytek to ask them if the product was incompatible with Forton and what I could do to fix the problem, since I still have quite a bit of the product left and don't want to waste all the material not to mention the money.

Here's where the good customer service comes in:

1) A PERSON answered the phone! Not a robo voice and endless loop telling me to punch a number for something - love having live people on the phone!

2) This real live person handed the phone to another real live person who knew the products involved - immediately - no waiting - they walked over and handed the phone to Stan.

3) Stan LISTENED. That's not a small point - let me make this clear, he LISTENED. Then he actually asked questions. We chatted for a bit and he explained that the rubber I used is usually used for casting and not molding. True - it was an unusual choice to use it for casting but I was under a tight deadline and this set up much faster than my other choice. The store I purchased it from knew it was a different use, but that it could work and given my unique situation for time the only choice.

4) We discussed the mold realease the I used (2300....but to be fair I also had 2500 on hand....did I use the wrong one?) Stan said 2300 was preferred but both should have worked like a dream. I freely admit to being in a sleep deprived state working long hours - I could have really messed up the release prior to putting on the forton.

5) Stan didn't say it was my fault. He said it should have worked but that he felt I would like one of their other products better and would I like to try it out? Well, yeah I would! I didn't call to complain, beat anyone up or expect a free sample. I called to find out if I used the product incorrectly and if it would was something I could still use for my needs or was it was waste for what I was trying to do.

6) Stan took my information and offered to send me a sample of the product.

7) I received an email from Stan within hours of our conversation.

8) Four days later this package arrived on my doorstep.

9) The packaged was packed with environmentally friendly peanuts that are food-based and dissolve in water - Yeah!

10) I received a generous sample of their 74-20 molding rubber to try on my new relief that I'll be finishing next week.

Once the relief is finished, I'll photo the entire process of making a mold using this sample of 74-20 and will post it all on my blog.

And that folks, is how a company gives great service.

Friday, October 17, 2014

Sculpting the Bas Relief Tutorial part 4

Here I am continuing to to add clay and build up the forms. It's very important to remember to turn your bas relief as you work, just as you would a sculpture fully in the round.

It's tempting to spend a lot of time in an area - but if you fail to work on all areas in equal amounts, you'll stop for a cup of coffee and come back to discover vast amounts of distortion caused by overworking a single area.

By turning the sculpture from side to side, you'll see where areas will need to be built up or pushed back. As the work evolves, you'll need to constantly reassess the depth of each area. This is where a discerning eye and artistic license will come into play. This isn't a canvas with a drawing or painting and it isn't fully round....it is somewhere in between. You'll need to employ drawing-like techniques to give the illusion of depth to some areas and that fine line can only be found as the sculpture
progresses.

As you can see here - I have determined how far out I want my high relief to protrude and as I work, I swivel the work from side to side to see it in profile to determine how far to build out the torso and the arms.

Don't be afraid to cut into the work. At this stage I cut off both her arms to allow access to the torso when I determined that it needed to be filled out more and brought further forward in the relief. That is part of the process.

Again, as you work, keep bones and flesh in mind - this will help keep your forms fresh as you work.
When taking a break from the work, as this is water-based clay, it must be wrapped up. I have found many ways of wrapping, but my favorite has become to simply mist the
sculpt and cover with plastic drop-cloth that I purchase by the roll. I like that I can cut it to size for the project and clings to the edges of the wood securely and helps to maintain the moisture until the next session.


Thursday, October 16, 2014

Sculpting the Bas Relief Tutorial part 3


Now that the clay is on the board and set upright on the easel and the image has been drawn onto the clay, it's time to start adding volume and mass to to image.

I begin by quickly blocking in the shapes - not trying to accuracy or likeness at this point - simply bring up the shapes to the highest point (in this case, the time of the nose and bottom of the skirt).

Always keep structure and anatomy in mind while you are working. Think in terms of bone and muscle. I'm not worried about surface features at all at this point - there will be time for that later.
Try not to become fixated on any part of the image. It's a trap to spend a lot of time working on face and neglecting other areas of the sculpture. Trust me, it never works out and when you finally do bring the rest of the sculpture up to the same level of finish as the face you'll find terrible problems with anatomy and distortion.

That said - I do begin with the face and keep coming back to it, as that sets the tone and emotion of the entire work.

As I said in Part 2, the drawing is going to be obliterated once you begin the actual sculpting. Clay is fluid - it moves while you work and you should never be afraid of cutting a sculpture apart and making changes as needed.

I decided that sculpt needed more tilt and attitude to the head, so I simply took a wire cutter, looped it under her chin and sliced her face off. Easy Peasy

Once her face was removed, I simply tilted the angle a bit and re-attched the face and reworked the neck. Then I set about roughing in more of the anatomy and continued to build up forms.


Tuesday, October 14, 2014

Sculpting the Bas Relief Tutorial part 2

Now that I have all the clay on the board at slightly larger than 18" x 24" and about 3/4" deep I ready to begin. I place the sketch onto the clay and cut away excess clay.

Next I cut the shapes out of the paper and place back onto the clay - this gives me paper to trace around.

I'm using a simple wooden skewer to do the tracing and drawing but you could use a stylus, knitting needle or sharpened pencil to get the same results.

Once the outline of the figures is traced onto the clay, I set the board up on an easel on my table. When sculpting a bas relief it is important to work as vertically as possible. Laying the board flat and trying to work on it will give you a distorted view as the perspective will change the look. Sculpt the work in the same position as
you plan for it to be viewed - as much as is possible.

At this stage it is rather heavy - I'd estimate that the board and clay combined is about 35-40 lbs.

I also like to tack up my drawings nearby as I'll be referring to them frequently as I work.

Next I take a loop tool and begin to dig down the background by about 1/4" inch all the way around. This separates the figures from the background a bit.

Finally, I grid off both my sketch and the clay - using the grid to help me locate proper placement, I begin roughly sketching in the drawing of the figures using the skewer. At this stage it will be very rough, which is fine, as it is only a starting place for me to gauge where I will be building up the forms and the 'drawing' on the clay will be
obliterated.
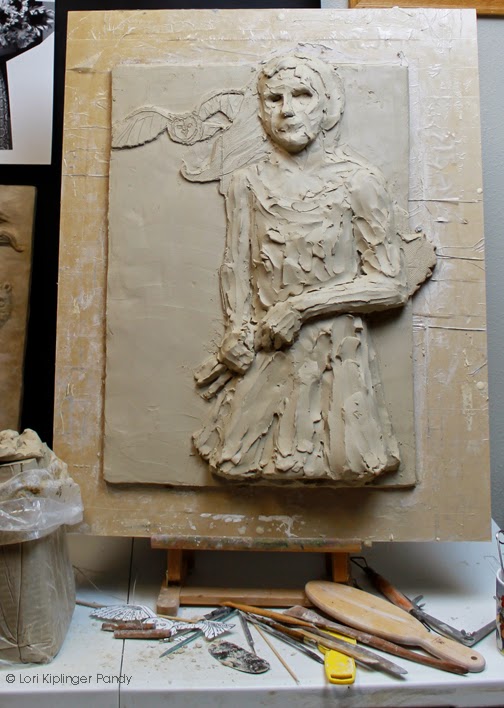
With the drawing in place I am ready to begin adding clay to the forms.