It's been a niggling dream for nearly all the 20 years that it's been operating. I remember seeing the articles about it in Southwest Art magazine way back when as I was living and struggling as a young artist if Florida. I always hoped to participate in this show but didn't believe in myself enough.
Thanks to the encouragement of my family and friends, I've started to apply myself to my sculpture last year. It was a real challenge to get my application and images submitted and I truly was uploading it at the midnight deadline ;-)
I am very excited about the opportunity and intend to continue to work hard, learn more and create the best I can!

Sculpting in fired ceramic clay and oil based clay for bronze sculpture.
Friday, March 4, 2011


Thursday, March 3, 2011
Mad dash to enter the Loveland Sculpture Invitational Show

Having no other place, I set up a temporary photo studio in the garage (thank goodness we insulated!) and learned to control my white balance and lighting better. It took two trips to Boulder (pretty drive, but still a 2+ hour round trip) to Mike's Camera to get the softbox and paper.
 Next I scoured off the patinas that I did in class that I felt were too dark and heavy. Since I didn't like the existing patina, I figured it wouldn't ruin it to try and take it off and do another. So I spend days doing glazes on the ceramic until I found what I liked. This seated woman, "Sitting Pretty" is definitely better with the new patina as the older one was very heavy and nearly black, obliterating detail.
The sleeping woman came out rather well - the patina is soft and warm and compliments the sleeping figure well.
Ascension is still a work in progress, but is coming along.
 Next is Sweetness, my plus-sized figure and last is Contemplate, a seated nude.
Hopefully I made the deadline - it was midnight tonight, but I did have some trouble using Zapplication and by the time Paypal processed it was 12:01.
Well - I did the best I could and I'm glad that I tried. Whether I made it into the show or not
learned a lot and it's all part of the journey.
Now for a well-earned glass of wine!


Thursday, February 24, 2011
Miniature Fox Sculpture with New Patina

My next endeavor will be to cast this fox in wax and chase it. I have an appointment with Art Casting Foundry in Loveland, where I'll be having this little guy bronzed!
I'm quite excited about that - I sculpted him with mold-making and bronzing in mind as I want to learn both processes.
Since this patina came out much better, it gave me the urge to work on some of my other sculptures. There were two in particular that I didn't care for how the original patina came out. Since I wasn't happy with the over all look, I decided that I could risk ruining them further by removing the patina and trying a different. It was a good choice - and I will post new photos of them soon.
Lastly, I've been struggling with my photography. On a shoe-string budget, I've been trying to outfit my photo area and have been making loads of test photos. Thank goodness for digital! Back in the day you could photo for a show, send the film off and not find out till a week later that they were awful! But now - Bam! upload the photos and see how bad they are instantly! ;-) Actually, I made real progress this week in getting white balance and lighting to agree - so new photos will be up soon!
Saturday, January 15, 2011
Cast sculpture miniature fox

This was cast using Smooth-On's Smooth-Cast 300 liquid plastic.
This is an easy product that is mixes compounds A+B in equal amounts. The plastic cures in a matter of minutes to a very white plastic. It demolded from the silicone very easily.
The down side is that, well, it's PLASTIC. Not my favorite substance. But this is a learning process . I painted the plastic casting using acrylics to mimic dark stone and the results are fine. I should have done a little more clean-up to the lines where the mold joins together, but for a first try at casting, I thought it came out well.
I could also pour melted wax into this mold, clean up the wax and take it to bronze at some point. We'll see ;--)

Miniature Fox Sculpture mold making
I took the miniature fox that I sculpted in December and made a mold (often called a pour or dump mold). I used Dragon Skin mold-making products by Smooth-ON.
1). Dragon Skin is a 2-part silicone mold - you mix equal parts of A + B. I also used Liquid Gloves - it forms a barrier to protect your hands from absorbing chemicals or paint - it feels nice, goes on like hand lotion.
2) I cut the bottoms off of two plastic cups to form a cylinder around the fox sculpture. I put a small bit of clay on the bottom of the fox sculpture to help it stay in place, then put the cups over it and sealed the bottom of the cups to the base to keep the silicone from leaking out.
3) I also put the whole thing on a small tray in case it leaked - but this time I sealed it well and nothing leaked out.
4) Mixing Parts A + B
5) Poured into the cylinder and curing (left it over night)
6) I took this to class and my instructor, Rik Sargent, helped me to cut the cured silicone on two sides on a diagonal to get the clay out.

1). Dragon Skin is a 2-part silicone mold - you mix equal parts of A + B. I also used Liquid Gloves - it forms a barrier to protect your hands from absorbing chemicals or paint - it feels nice, goes on like hand lotion.
2) I cut the bottoms off of two plastic cups to form a cylinder around the fox sculpture. I put a small bit of clay on the bottom of the fox sculpture to help it stay in place, then put the cups over it and sealed the bottom of the cups to the base to keep the silicone from leaking out.
3) I also put the whole thing on a small tray in case it leaked - but this time I sealed it well and nothing leaked out.
4) Mixing Parts A + B
5) Poured into the cylinder and curing (left it over night)
6) I took this to class and my instructor, Rik Sargent, helped me to cut the cured silicone on two sides on a diagonal to get the clay out.
Friday, January 7, 2011
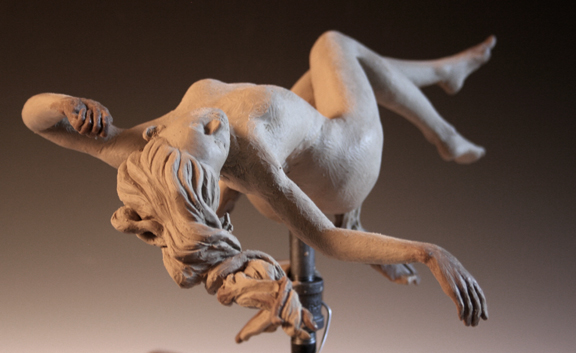
"Ascension" Oil clay figure sculpture work in progress


I'm very excited about my first oil-based clay figure sculpture. It's the first time I've used a wire armature. This is loosely based on a life pose from the Art Students League class that I took under Rik Sargent recently. I'm still getting used to the Classic Clay - rather sticky feeling in comparison to water-based clay.
You'll notice that some of the hands, feet, hair and cloth are a darker color. Rik showed me that you can mix casting wax with the clay to make a much harder clay mix that can hold smaller detail better than the oil clay alone. So even though I had fully sculpted her hands and feet, I cut them off, re-sculpted them using the wax/clay mix and reattached them.
Because I wasn't really basing the sculpt on any particular pose from the model, it changed as I aggressively manipulated the figure for more drama - thereby exposing some of the armature wire in the process. In addition, the pipe supporting her is also in the way. I will be making a mold and casting this piece in wax. Once I have the wax, I'll be able to sculpt away the imperfections caused by the wires and post.
Finally, I may make a mold of the wax and take it to the foundry for casting my first bronze. When she's complete, the flowing cloth will be her only support - she'll appear suspended in mid-air, caught in the moment of ascension.
Rik has generously offered to help me through the steps working with moldmakers and the foundry. If you ever have the opportunity to take a class with Rik DO IT! He's a very giving and inspiring sculptor and teacher!


Monday, December 20, 2010
Miniature Fox Sculpture in Oil Based Clay

It was fun to sculpt something different from figure and interesting to try and capture the essence of a fox without worry of trying to be anatomically correct. The oil-based clay is still kind of new to me and the sticky texture is still something that I'm getting used to. The upside is that you can stop and start as many time as you wish and it never dries out like water-based clay.
This measures 3.5" tall and is sculpted in Classic Clay purchased from Sculpture Depot. Next I'll be showing the process that I used to make a pour mold of this sculpt. I learned this technique in the sculpting class that I took with Rik Sargent at the Denver Art Students League.


Thursday, November 11, 2010
Contempative Woman - a ceramic nude sculpture work in progress
 I started this sculpt when taking Philippe Faurat's figure study class at the Sculpture Depot two months ago. If you ever have the opportunity to take Philippe's class then DO IT! He's an amazing sculptor and a hoot and a half too ;-)
 So this technique is new to me - the sculpture is almost entirely solid. According to Phillipe - she'll fire just fine if REALLY DRY first. (Fingers Crossed) As I live in semi-arid Colorado, dry isn't really a problem here. I'd say that I had about 10 hours of model time on this piece and put in another 4 to 5 hours sculpting at home and she's about 80% done. I’m juggling illustrating a children's book at the moment, so I've kind of shelved her for a while and just misted her with water a few times.
This is a low-grog ceramic clay and it is 16" high. I believe that it will fire to a white finish and plan on doing a marble/stone look for the patina if she survives the firing. I'm looking forward to taking a few more hours to refine and finish before the long, slow drying process.


On another note – I may have a kiln! I’ve been looking on Craigslist for a year now and if all goes well, I should have it by next weekend….then I’ll be able to fire my pieces and be more productive – very exciting!
Next up, I’ll be showing you my first oil-based clay figure. It’s one I’m working on from a class from the Denver Art Students League with Rik Sargent as the instructor. Another terrific teacher – you really need to look at Rik’s work – his monumental bronzes are amazing and he’s been such an informative teacher – I’ll do my next post on his class and my new piece….
Friday, October 1, 2010
Sleeping Nude

I'm getting better at letting go, smashing up studies or sculpture that isn't working. Don't get me wrong - I was quite pleased with many of the small studies, but the process and experience was what I was after, not the physical product. So I only kept one of the smaller studies. We had about 4-5 hours with the model in this pose, then I did the rest at home. This is water based clay with low grog and the piece is about 9 inches long. This one I sculpted solid and didn't hollow. I'll allow to dry very, very slowing and try firing it my my ancient, questionable little kiln. If it doesn't make it, well, it was fun to sculpt anyway ;-0

Friday, September 3, 2010
Patinas and Pedestals

I had fired a few of the ceramic sculptures - then then them sit around as I dreaded attempting the patinas. I did a few using special Forton mixes with a chemical reaction. Since I only did a few, it's a little unfair to make a judgment. My first impression, however, is that the Forton mix is a bit thick and obliterates the sculptural surface a bit for my tastes. The outcome was very difficult to predict and I wasn't in love with the overall look of some of them.
I painted the Scarlet Robe in oils, which was messing and time consuming but the overall effect was nice. For the "Claire" bust, I opted to try many glazes of acrylic. Some of the layers, I spritzed with alcohol to break up the surface and create pattern - that worked rather well. Some of the layers I lightly sponged for additional texture.
The effect is pleasing and rather stone-like. With practice, I'd think that this would work really well on a lot of sculptures. Still working on my photography skills and lighting. As I don't have a dedicated space or the proper lights, it's still something that I need improving upon. The base was made by Imported Onyx in Loveland.
Monday, July 12, 2010
The Scarlet Robe - Oil Paint Patina
I wanted something muted for the sculpture of the woman and vibrant for the robe, so I opted to try glazing with oil paints. The mistake I made was using Liquin to speed up the drying of the cadmium red, which led to a shiny finish that I didn't really envision. My bad. The woman is muted and and more in line with what I was looking for - a subtle finish. Couldn't really say how many thin oil washes I used, probably about 8.
I did find, however, that I probably could have achieved a similar look using acrylics, as the porosity of the fired clay knocks down the sheen that acrylics can leave. I would probably opt to try another patina using many thin layers of acrylics to compare.


I did find, however, that I probably could have achieved a similar look using acrylics, as the porosity of the fired clay knocks down the sheen that acrylics can leave. I would probably opt to try another patina using many thin layers of acrylics to compare.


Forton Metal Patina
Whew....been a long time since my last post. We've been renovating some buildings and our house so time has been detoured.
Due to snow, I was only able to make a couple of the patina classes with Andi at the Denver Art Students League. The photos won't be very good, as I don't have a place to set up for photos at the moment. Hopefully I'll be able to get some better ones, with bases, up soon.
This sculpture had a base coat of Forton and bronze/brass metals. Then I used a mixture of several different oxides and patinas from the class. After the metal had oxidized, I buffed with a bit of steel wool to bring back the metal. It came out a bit darker than I had anticipated. I do think I like it overall.


Due to snow, I was only able to make a couple of the patina classes with Andi at the Denver Art Students League. The photos won't be very good, as I don't have a place to set up for photos at the moment. Hopefully I'll be able to get some better ones, with bases, up soon.
This sculpture had a base coat of Forton and bronze/brass metals. Then I used a mixture of several different oxides and patinas from the class. After the metal had oxidized, I buffed with a bit of steel wool to bring back the metal. It came out a bit darker than I had anticipated. I do think I like it overall.


Wednesday, April 21, 2010
Reclining unfinished nude - ceramic clay

This was another 5 hour sculpt done in water-based clay. Sadly - it's the last one for the class. It's about 19" long and 10" wide. In this piece I worked her head "off sculpt" - which means that I cut her head off to hold upright in my hands to sculpt for a bit and then re-attached her head.
"Unfinished" because I'm experimenting with not sculpting 'everything'. Not sure how successful I was in not completing the arm and leg....what do you think?
I was more interested in the negative spaces and openings. I plan on making the base clay that she's lying on very light so that the dark forms and open spaces show up on the nude more.
Took a lot of liberties with this one. I had about 4 hours with the model, but her proportions were very short and rather chunky. At first I started to sculpt her as she was, was then I thought, why? After all, this isn't a commission. So about 3 hours of the sculpting process was capturing the woman before me (she had her hips raised on pillows and her head lower - both arms were up - with hands under her head), I decided to change things - so I lowered her hips to level, turned her head the opposite direction and put one of her arms down. It was too late at this point to give her much more in the way of length. If I were to do it over, I'd take even more liberty and really stretch her out a lot - I think it would please me more.
Anyway - she's currently drying and awaiting firing. Sorry for the photos - I just snapped a few quick shots and they aren't very good ones... (Chestnut water clay cone 6).
In the mean time - I'm happy to say that all my other sculpts fired beautifully. The one sad news was that one fell during the long drive home from Denver and broke her leg. A lot. I'm currently trying to repair it using epoxy compound. We'll see how it does.
Next will be my patina class in May! I'm looking forward to working with the patinas to see the different effects. They will also cover the repairs to the one sculpt with the broken leg. I'll make a post of her repair soon too.


Thursday, April 8, 2010
5 hour Clay Portrait Study
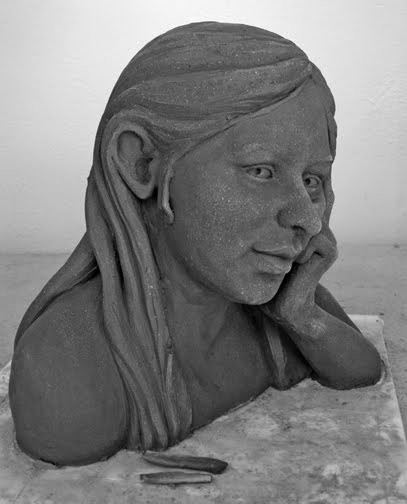 Here we have a ceramic clay sculpture portrait study. I did this in one quick session of 2 1/2 hours then another 2 hours without the model at home. I didn't get good photos because I forgot to photo it at home and had to take a quick shot at the class while she was partially dry (which is why the clay is speckled).
As you can see, her strand of hair broke off in transport. She's also a bit flat in the back because I was worried that the clay had gotten too thick and I'm trying to be careful about the thickness of the clay for firing. So if she fires okay - I may be able to repair the strand of hair that broke off. Hope so anyway.....but it's all a learning experience!
Saturday, March 13, 2010
Crash and Smash
Sorry - no photos today. You'd think I'd remember the camera on my phone ;-)
This week I did a standing 3/4 nude on a large scale. It was hard to keep the clay from slumping on such a large scale (about 26-30"). I was determined that on this piece I would do a better job with the paper core to avoid having to cut and hollow the piece. My goal was to allow for a lot more freshness and looseness on this piece. I probably got about 1 1/2 hours done on Wednesday. On Friday, I found that the sculpt had compressed a bit, the movement to the pose and back were still quite nice, however. Throughout the next three hours I was furiously and managed to get her nearly complete, including her hands, face and hair. The piece had a roughness and grace to it and I really made progress in keeping that fresh, painterly feel.
Since we'll be going on Spring Break, I needed to take the sculpt home. Bad call...while I was successful in transporting the other sculptures, this one probably had about 30 pounds of wet, top-heavy clay. Even with good bolstering in the car, she broke and collapsed on the way home. I was unsuccessful in fixing this time. Wish I'd have photoed before I transported.
Oh well, I went into the class expecting everything to crash, explode or fail, just to make myself do the work for the sake of learning, and doing the work. Very freeing and I'm glad that I'm sticking to that goal...
This week I did a standing 3/4 nude on a large scale. It was hard to keep the clay from slumping on such a large scale (about 26-30"). I was determined that on this piece I would do a better job with the paper core to avoid having to cut and hollow the piece. My goal was to allow for a lot more freshness and looseness on this piece. I probably got about 1 1/2 hours done on Wednesday. On Friday, I found that the sculpt had compressed a bit, the movement to the pose and back were still quite nice, however. Throughout the next three hours I was furiously and managed to get her nearly complete, including her hands, face and hair. The piece had a roughness and grace to it and I really made progress in keeping that fresh, painterly feel.
Since we'll be going on Spring Break, I needed to take the sculpt home. Bad call...while I was successful in transporting the other sculptures, this one probably had about 30 pounds of wet, top-heavy clay. Even with good bolstering in the car, she broke and collapsed on the way home. I was unsuccessful in fixing this time. Wish I'd have photoed before I transported.
Oh well, I went into the class expecting everything to crash, explode or fail, just to make myself do the work for the sake of learning, and doing the work. Very freeing and I'm glad that I'm sticking to that goal...
Tuesday, March 9, 2010
Plus-sized nude model
 We had a plus-sized model this week. Again, I had just a little over 4 hours with the live model. I took the sculpt home and worked another 7-8 hours from memory - including time to cut her into pieces, hollow out and reassemble.
I was too excited to start sculpting and forgot Andi's paper cores...I started sculpting her solid and once I'd gotten a ways it was too late to turn back. So I went ahead and sculpted solid for a little while, then cut her into three pieces for hollowing out. I'll be sure to try and be more restrained on the next piece and really try to get the paper core down and this time, with thicker walls of clay to better support and have less problem with paper coming through to the surface... ;-)
The large model was a new challenge for me. I've never worked with heavy models before and the mass and weight and gravity were new and interesting. It was a different way to sculpt and see things since I usually work with more muscular or thinner more angular figures.
Another area for me to work on is my photography. Granted, these were done quickly to document the stages of work, but the photos aren't very good. Hopefully I'll get some better photos done when I fire and do the patina.


I also wish that I was able to keep the freshness. I'm at war with myself; one part of me wants to really work out the anatomy and the other part of me wants a looseness and spontaneous feel. While I like the mass and roundness of this piece, I think I missed the mark with going for a more artistic feel. I think that having to cut into pieces for hollowing and then repair the damage from the cutting encourages me to get too fussy over the finish and obliterates the stokes and marks of the clay - making it too 'rendered'. Well, there's always the next one...always the challenge...


Thursday, March 4, 2010
Nude and Drapery Sculpture Study

This week, at the sculpture class with Andi Mascarenas at the Denver Art Student's League, we did a nude study using some drapery. I had about 3 1/2 hours with the model and then continued the work at home for another 4 hours. The drapery was challenging, as every time the model took a break the drapery was different when she came back to model. I had the usual challenge of the paper core coming through and a few places where the wall of clay was very thin. When I got the sculpt home, I endeavored the remove the paper and had quite a bit of breakage that needed repair. I think it goes to show that I'm starting with the wall of clay too thin from the start, so will try to correct that problem on the next sculpt.
Another problem that I encountered was slumping. Because we're trying to work so fast, since we have limited class and model time, there isn't enough time for the clay to firm up much before we sculpt. I found that the weight of the top part of the sculpt was causing the bottom, her legs, to smash down. In order to correct that problem, I had to add more paper and then more clay to the base in order to bring the overall height back up. Unfortunately, I also over-corrected for that slumpage and you may notice that her lower torso is elongated. The proportion of the lower torso being too long isn't terribly unpleasing, at least to me, which is surprising since I tend to be a perfectionist.
But then, that is something that I've been working to overcome and one of the main reasons that I'm taking Andi's class. Good art isn't perfect. It's beautiful or evocative, or interesting, but not really perfect. So I'm trying to force myself to produce a lot more art and to learn something from each piece and to try to find the interest or emotion, or thought for each one, instead of the exact reproduction of what is already there.


Subscribe to:
Posts (Atom)