Showing posts with label bronze sculpture. Show all posts

Tuesday, June 13, 2017

Original clay sculpture of boy reading comics at foundry

 "Sunday Comics" 16" bronze edition of 10 - Release Date 7/23/2017

 This was such an enjoyable commission to do. I love historical things and my mother has told me stories of how she and her family gathered around the all-important radio to hear their special shows. She grew up on a dairy farm in Ohio during the Great Depression and World War II and the radio, especially in remote farm areas was a life-line to the world, the news and was often a source of comfort and company. The woman who commissioned this bronze is honoring her husband and his passion for reading and their local library. He actually learned to read by listening to the radio announcer reading the Sunday Funny papers.  This is the clay original - the 'paper' is sculpted in wax and has cartoons etched into the surface.

The sculpture measures 16" long and is currently at the foundry being cast in a bronze edition of 10. It will be mounted onto a shaped hardwood base with a turntable on the bottom for rotation of the finished sculpture. The first of this bronze edition of "Sunday Comics" is going to the Walker Branch Library in Walker, Michigan.


Thursday, May 28, 2015

Chasing and more wax chasing


I've been busy chasing wax. First it was the new wax for "Waiting on the #9" that needed to go to the foundry and next it was the new wax for the Least Bittern sculpt "Two Possible Outcomes". The sculpture is cut into pieces during the mold-making procedure and the wax is poured and ready for chasing.

The process from clay to bronze is long and arduous. You can see that the wax pour has seam lines where the mold comes together. Sometimes they are small and easily removed but sometimes they are large and require hours of work to fix.

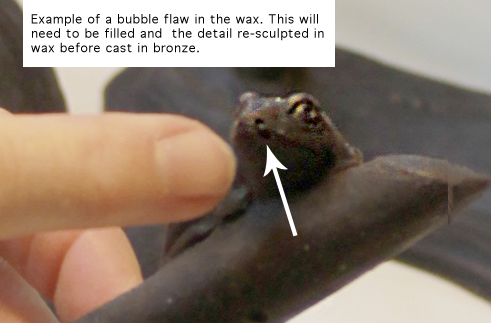
Bubbles are a common problem. I had the foundry pour 3 frogs and each one had this bubble. I did a test pour at home that I took extra time to brush the hot wax into the mold before pouring and it yielded better results with no bubble so I will probably pour the waxes for this frog...the extra time for me to brush and pour the hot wax was considerably less than the time it took for me to correct, fill and fix these imperfections.

All in all, the wax chasing took quite a bit of time to complete and return to the foundry - now the next step for them is to start making the slurry shell. The estimated time for the this to be in bronze is 7/24/15...and it was turned into the foundry on 5/27/15 - as I said - a long process to get to metal and then even more time to apply the patina and mount the base.

Saturday, April 25, 2015

Least Bittern at foundry and offered at precast pricing

I have finished the life-sized Least Bittern with green tree frog. I'm still pondering the title of the piece and the predicament of the little green frog but it is currently at the foundry getting the mold made before staring the arduous process of casting in bronze.

This sculpture is of a Least Bittern, smallest of the herons in the U.S., perched upon reeds. This is their common practice for feeding. These little birds are slow-moving and rather than wading like larger herons they take advantage of their smaller size by hiding among the grasses and reeds and perching motionless to hunt with their spearlike bills. Its prey are small fish, insects, freshwater shrimp and yes, frogs.

This Least Bittern sculpture measures about 14.75" high x 10.5" wide by 11" deep and will be cast in traditional bronze and have a shaped wood base. Currently being offered at pre-cast pricing starting at $2100*. The retail price will be $2800 in a limited edition of 20.


*Precast pricing is the practice of offering to sell the first of a limited edition of bronze before the offical release date at a discount to help offset the costs of producing a bronze edition.
I am offering the following pre-cast discounts:
25%  discount on #1 of 20
20%  discount of #2 of 20
15%  discount of #3 of 20
10%  disount of #4 of 20
5%    discount of #5 of 20
Sculptures must be purchased prior to the release date of July 31st. 50% down to pace the order, 50% upon delivery of the sculpture. Money back gurantee on my work. Foundry time is 9-12 weeks from placement of order to delivery of finished bronze.

Wednesday, October 1, 2014

Glyptic Sculpting Tool Review

I'm trying something a little different by doing a video review today. Depending on how long it takes me to learn to video, edit and upload I may choose to do more in a video format - or may do them occasionally while doing regular blog posts with still photos. The goal is to share information but not to take away too much actual sculpting and studio time.

Every sculptor has an arsenal of sculpting tools. Some are used once and deemed not very useful and others get used into the the ground. I have some great tools that use quite a lot and it shows. I have some that are constantly breaking or pulling apart at the ferrule. Yes, I can usually fix it by mixing a two-part epoxy and cemented it back together - but over time they break again.

One tool that has never had this problem is the Glyptic Sculpting Tool. I have the Glyptic E Handle which is for small and medium loops and do plan to buy a larger tool for my next sculpting project. What I like is that because the loop extends down into the aluminum handle it takes the pressure off the ferrule area, resulting in a strong tool. I can really dig with this baby and it doesn't give, bend or wiggle and trust me, in a cold Colorado studio, the clay can get pretty hard - bending and breaking tools is common.

You can also easily change out the tool's loop ends from small to medium, smooth and serrated. The set of loops that I have is medium serrated and comes with 7 loop ends and a small hex wrench.

Simply loosen the small hex bolt, slide out the loop, choose a new loop to insert and re-tighten the hex bolt and you're ready to sculpt with a new size or shape of loop tool.

I got mine about 5-7 years ago from SculptureDepot.net and it is still in as good of a shape has when I got it. When you compare that to the tools that I have epoxied back together, that's saying something.

Hopefully I'll get video and editing figured out better so I can splice in video of the tools being used...

Friday, July 12, 2013

Making changes and corrections to your wire armature

 Once the armature was very secure and those feet firmly attached to the board I began laying in some clay on the wire to create a simple skeleton framework. A guest to my studio was curious as to why I would go through the work and trouble to do this as it will all get covered up later. One major reason is that proper anatomy begins with the bones. If the bones are wrong, the rest will be wrong too. Placement of major bony landmarks helps the artist create the forms of the body and by starting with the basics, you have a firm foundation. It's also much easier to see and correct problems before you get too far along in the sculpt.
In this case, I found my problem rather quickly. By using some of the leg wire to firmly attach the armature to the base (and allow space for the clay ground upon which she stands) the leg armature was shortened. Not dramatically for physical accuracy, but as an artist I can take liberties to create the art as I wish, rather than is average. In this case, I want my figure to be a more balletic figure of 8.5 heads. By roughing in the bones I immediately detected that the legs were going to be shorter than my desired length.

A quick check with my proportional calipers confirmed my eye and I set about deciding how much I needed to lengthen my leg wire. I decided that the best place to add wire is to the femur, as the upper leg has more muscle and fat. So I cut the wire at the upper part of the leg and raised the torso bolt up the support pole to create a gap where I cut the wires. I now had lower legs attached to the board and the rest of the armature hovering above the lower legs.

Then I took a smaller gage aluminum wire and cut it longer than the gap separating the legs. With floral tape, I secured the new wire to the armature and then wrapped with fine gage copper wire to firmly secure to existing armature wire.

Once the wire was wrapped, I mixed a two part epoxy putty and covered the femur - once cured the new armature area is stronger than the original - the lengthened leg addition is now exactly what I want and the armature has been altered to meet the needs of this particular sculpt.
Remember - you can create your own armatures or make changes to store-bought armatures at any time to suit your style and tastes.
(Oh - and if you are wondering about the toothpick - that is marking the Suprasternal notch - another useful landmark....)


Wednesday, June 26, 2013

Wax off to foundry for bronze

Murphy's Law strikes again. When I started "Loss" (working title) in waterbased clay over an armature I was planning on sculpting quickly and getting her to the moldmaker quickly before the clay dried. Then my publisher called with illustration work and deadline after deadline meant that the clay sat for long periods without work and parts dried and cracked before I could get her to the moldmaker.

Consequently, the mold isn't the best and required copious amount of sculpting in wax to repair. Naturally that is when my thermostat regulator that I use to dial down the heat (on my wood-burning tool that I use for wax chasing) died.

That meant that the tool now had two settings: Off and Vaporize. I do mean *POOF!* - touch that hot tip to wax and it disappears into a noxious cloud. So I spent many hours warming metal tools against the hot tool and then trying to sculpt the wax. Not the best system, but what I had available.

So - the chased wax has been delivered to the foundry and appointments set for the Metal Chaser and Patina Artist to follow - next up is taking he base template into the base shop to have the cut while I'm waiting for the bronze to be made.


Friday, June 7, 2013

Sculpting Loss - off to moldmaker

Been crazy busy - lots of illustration work, daughter graduating and folks visiting!
I finished up sculpting the emotion of 'loss' and got her to the moldmaker. It was an experiment in sculpting water-based clay over armature for bronze. I really enjoy sculpting in waterclay - but with the extended time that took, it dried out several times, which is quite problematic.

Also, there was some cracking in thinner areas that will all have to be fixed each and every time in wax.....so that will be a chore.

So, if I do waterclay again, it will need to be done on a faster time schedule to keep those problems at bay.

 The photos are quite awful, but I didn't have time to get better ones.Currently the sculpt is now at the mold-makers so we can get the first wax poured and off to the foundry.
15" tall x 4" wide x 15" long.

This sculpture represents the emotion of loss and pain. The base is the shadow of the woman - depicting the feeling of despair stretching ahead of us, darkening our path. The small hole in the base is her heart...


Tuesday, August 7, 2012

Revising works in progress - portraits in clay for bronze


I refined the maquette of "The Pageturner". A lot of the work was done listening to the Wendy Woo concert at the CSU Lagoon Concert Series, where I sculpted at the show.

Surprisingly, this clay is also Chavant LeBeau Touche. This clay, however is light in color, which I much prefer to two reasons:
1) It's easier to see the shapes and shadows of forms
2) It doesn't stain everything

This clay was less sticky and responded much better than the terra cotta colored clay that I used for "Waiting on the #9". That leaves me to believe that the clay is quite nice, actually, and I simply must have had a bad batch for that earlier sculpt. This is still a bit soft, but had a much more lovely feel to it. This isn't an exact portrait of my daughter, but rather an impression of her: forever lost in her books and absently playing with her earrings or necklace and simply lovely in her quiet repose.

As you can see, it is quite small, but I rather like her as a tiny piece and may cast her as is and then enlarge to 1/2 life size later.

I also did some more work on the portrait of my daughter in water-based clay. After hollowing out too soon and suffering the consequences, I've got her nearly completed. The clay has firmed up nicely and I will put the finishing touches on her tonight and let dry before firing. This piece is life-sized, using CT3 clay.

Friday, August 3, 2012

Metal chasing Harriet Tubman and Waiting on #9

Busy week preparing for the Loveland Sculpture Invitational next week. There were some glitches in getting the two Ascensions ready - but I finally picked them up from Art Castings yesterday and they're beautiful. The bronzes for Harriet Tubman- Triumph and Waiting on the #9 were completed by Madd Castings and Bob Page did a fabulous job chasing them both quickly. Thanks, too, to Tessa Derbin for some great customer service in moldmaking and wax pouring. Both those pieces are now at patina specialist Dale Cisek's and should be completed on Monday and ready to go back to the Base Shop for the final basing.